2023 - June
- Virtual Machines
Virtual Machines
A Virtual Machine (VM) is a way to create a whole operating system, with many applications, that is able to be moved from one physical machine to another physical machine. This has advantages in case of hardware, location or network problems to quickly and correctly restore service.
The following descriptions follow a VM on Redhat/AlmaLinux/RockyLinux/CENTOS 9 using qemu virtualizer and the Cockpit management web console. We also set the VM network up for external access and share files with the physical host's NFS mount. [1]
Reference:
Install Prerequisites
Install the virtualization hypervisor packages.
- Redhat:
$ sudo dnf install qemu-kvm libvirt virt-install virt-viewer
- Start the virtualization services:
$ sudo for drv in qemu network nodedev nwfilter secret storage interface; do systemctl start virt${drv}d{,-ro,-admin}.socket; done
- Debian:
$ sudo apt install qemu-kvm libvirt-daemon bridge-utils virtinst libvirt-daemon-system
Load the network module into the running kernel
$ sudo modprobe vhost_net
$ lsmod |grep vhost
vhost_net              36864  0
tun                    61440  1 vhost_net
vhost                  57344  1 vhost_net
vhost_iotlb            16384  1 vhost
tap                    28672  1 vhost_net
Make it load at boot time by adding this line
File: /etc/modules
vhost_net
Optional Tools:
- libguestfs is a set of tools for accessing and modifying virtual machine (VM) disk images. You can use this for viewing and editing files inside guests, scripting changes to VMs, monitoring disk used/free statistics, creating guests, P2V, V2V, performing backups, cloning VMs, building VMs, formatting disks, resizing disks, and much more.
$ sudo apt install libguestfs-tools
- The libosinfo project comprises three parts
A database of metadata about operating systems, hypervisors, virtual hardware and more A GObject based library API for querying information from the database Command line tools for querying & extracting information from the database
$ sudo apt install libosinfo-bin
- qemu-system and virt-manager allow command line and graphical starting, stopping, configuring qemu-kvm systems
$ sudo apt install libguestfs-tools libosinfo-bin qemu-system virt-manager
- Bridge definitions
Install bridge-utils
$ sudo apt install bridge-utils
Add the iface br0 inet dhcp, and assign bridge_ports to an ethernet interface (probably USB)
File: /etc/network/interfaces
# This file describes the network interfaces available on your system
# and how to activate them. For more information, see interfaces(5).

source /etc/network/interfaces.d/*

# The loopback network interface
auto lo
iface lo inet loopback

# USB Ethernet
auto enxc87f54384756
iface enxc87f54384756 inet manual

# Bridge setup
auto br0
iface br0 inet dhcp
    bridge_ports enxc87f54384756
$ ip a ~ 3: enxc87f54384756: <BROADCAST,MULTICAST,UP,LOWER_UP> mtu 1500 qdisc fq_codel master br0 state UP group default qlen 1000 link/ether c8:7f:54:93:56:44 brd ff:ff:ff:ff:ff:ff ~ 6: br0: <BROADCAST,MULTICAST,UP,LOWER_UP> mtu 1500 qdisc noqueue state UP group default qlen 1000 link/ether 86:32:53:56:4a:fa brd ff:ff:ff:ff:ff:ff inet 192.168.1.2/24 brd 192.168.1.1 scope global dynamic br0 valid_lft 86082sec preferred_lft 86082sec inet6 fe80::8432:53ff:fe56:4edf/64 scope link valid_lft forever preferred_lft forever
Reference:

 * <https://wiki.debian.org/BridgeNetworkConnections>
 * <https://wiki.libvirt.org/Networking.html#debian-ubuntu-bridging>

> ??? Apparmor and Selinux may require more permission. , maybe using /home, trying /local

/etc/apparmor.d/local/abstractions/libvirt-qemu

- Set user and group
File: /etc/libvirt/qemu.conf
~ user = "libvirt-qemu" group = "libvirt-qemu" ~
 Then reboot.


## Install Cockpit

Cockpit is a web based system allowing full management of systems, including virtual qemu systems.

Install packages cockpit and cockpit-machine.

> Install postfix first on Debian, or else exim4 mail server will be installed with cockpit
$ sudo dnf install cockpit cockpit-machines
Start Cockpit and libvirtd:
$ sudo systemctl enable --now libvirtd $ sudo systemctl start libvirtd $ sudo systemctl enable --now cockpit.socket
To log in to Cockpit, open your web browser to localhost:9090 and enter your Linux username and password.

Reference: <https://www.redhat.com/sysadmin/intro-cockpit>

## Virtual machines in Cockpit

Click on Virtual machines to open the virtual machine panel.

If you have existing virtual machines with libvirt, Cockpit detects them. Should Cockpit fail to detect existing virtual machines, you can import them by clicking the Import VM button.

Cockpit knows the virtual machine's state and can start or stop it. In the pop-up menu on the right, you can clone, rename, and delete the virtual machine.

### Create storage pools with Cockpit

A storage pool is space that you designate as being available to store virtual machine images. You can set a network location, an iSCSI target, or a filesystem.

In Cockpit, to create a storage pool, click the Storage pool button at the top of the virtual machine panel.

View storage pools
$ sudo virsh pool-list --all --details Name State Autostart Persistent Capacity Allocation Available
data running yes yes 1.27 TiB 15.45 GiB 1.25 TiB
If no storage space is created, the default /var/lib/machines will be used.

Reference: <https://access.redhat.com/documentation/en-us/red_hat_enterprise_linux/9/html/configuring_and_managing_virtualization/managing-storage-for-virtual-machines_configuring-and-managing-virtualization#assembly_managing-virtual-machine-storage-pools-using-the-cli_managing-storage-for-virtual-machines>

### Create a new virtual machine

To create a new Virtual Machine, click the Create VM button on the right side of the virtual machine panel.

You can download a recent operating system version from a drop-down list, or you can choose an ISO image on your local drive, or you can have the virtual machine boot from a Preboot Execution Environment (PXE) server.

Reference: <https://access.redhat.com/documentation/en-us/red_hat_enterprise_linux/9/html/configuring_and_managing_virtualization/assembly_creating-virtual-machines_configuring-and-managing-virtualization>

Start it:
virsh --connect qemu:///system start almalinux9-2023-10-6
Restart install:
$ sudo virt-install --connect qemu:///system --quiet --os-variant almalinux9 --reinstall almalinux9-2023-10-6 --wait -1 --noautoconsole --install os=almalinux9
### Examine a virtual machine

Display the info about your virtual machines
$ virt-host-validate
QEMU: Checking for hardware virtualization : PASS QEMU: Checking if device /dev/kvm exists : PASS QEMU: Checking if device /dev/kvm is accessible : PASS QEMU: Checking if device /dev/vhost-net exists : PASS QEMU: Checking if device /dev/net/tun exists : PASS QEMU: Checking for cgroup 'cpu' controller support : PASS QEMU: Checking for cgroup 'cpuacct' controller support : PASS QEMU: Checking for cgroup 'cpuset' controller support : PASS QEMU: Checking for cgroup 'memory' controller support : PASS QEMU: Checking for cgroup 'devices' controller support : WARN (Enable 'devices' in kernel Kconfig file or mount/enable cgroup controller in your system) QEMU: Checking for cgroup 'blkio' controller support : PASS QEMU: Checking for device assignment IOMMU support : PASS QEMU: Checking if IOMMU is enabled by kernel : WARN (IOMMU appears to be disabled in kernel. Add intel_iommu=on to kernel cmdline arguments) QEMU: Checking for secure guest support : WARN (Unknown if this platform has Secure Guest support)
Start a VM
$ sudo virsh start demo-guest1
Stop a VM
$ sudo virsh shutdown demo-guest1
VM Diagnostics: <https://access.redhat.com/documentation/en-us/red_hat_enterprise_linux/9/html/configuring_and_managing_virtualization/diagnosing-virtual-machine-problems_configuring-and-managing-virtualization>

### Network on a virtual machine

#### NAT VM Network (VM network *default*)

By *default*, a newly created VM connects to a NAT-type network that uses virbr0, the default virtual bridge on the host. This ensures that the VM can use the host’s network interface controller (NIC) for connecting to outside networks, but the VM is *not reachable from external systems*.

> See file /etc/libvirt/network/default.xml


``` mermaid
graph TD;
        Router<--->eth0;
        PhysicalHost<-->eth0;
        NAT-virbr0-->eth0;
        VM-->NAT-virbr0;
Bridged VM Network (Physical Host bridge)
If you require a VM to appear on the same external network as the hypervisor, you must use bridged mode instead. To do so, attach the VM to a bridge device connected to the hypervisor’s physical network device.
See file /etc/nmstate/50-create-bridge.yml below
graph TD;
        Router<-->eth1;
        eth1<-->bridge-virbr0;
        bridge-virbr0<-->VM;
        Router<-->eth0;
        PhysicalHost<-->eth0;
        eth0<-->vlan1;
        vlan1<-->NFS;
RedHat Way [1]
- Create a nmstate configuration file on the physical host.
Install nmstate, is not already done
$ sudo dnf install nmstate
In this example the host IP address will be fixed at 192.168.1.12, and the guest (VM) will pick up a DHCP address from the local DHCP server. Of course you should change the router address (192.168.1.1) and maybe the DNS resolvers (1.1.1.1 and 1.0.0.1). The port (eno1) is the machine's onboard ethernet port. Port eno1 will no longer have an IP address, rather bridge interface owns the IP address.
Bridge should be created before any vlan to allow routing for bridge. Otherwise the vlan will become the first route, blocking outside access.
File: /etc/nmstate/50-create-bridge.yml
# https://access.redhat.com/documentation/en-us/red_hat_enterprise_linux/9/html-single/configuring_and_managing_networking/index#proc_configuring-a-network-bridge-by-using-nmstatectl_configuring-a-network-bridge
# ---
interfaces:
- name: virbr0
  type: linux-bridge
  ipv4:
    enabled: true
    address:
    - ip: 192.168.1.12
      prefix-length: 24
    dhcp: false
  ipv6:
    enabled: false
  bridge:
    options:
      stp:
        enabled: true
      vlan-protocol: 802.1q
    port:
    - name: eno1
It is important to disable the default virbr0 network interface within Cockpit/virsh.
$ sudo virsh net-destroy default
Network default stopped
$ sudo virsh net-autostart --disable default
Network default unmarked as autostarted

$ sudo virsh net-list --all
 Name      State      Autostart   Persistent
----------------------------------------------
 default   inactive   no          yes
Hint: net-destroy only stops the running process ;-)
Apply the bridge network config, fix any errors.
$ sudo nmstatectl apply /etc/nmstate/50-create-bridge.yml
IP address check on physical machine
$ ip a show virbr0
5: virbr0: <BROADCAST,MULTICAST,UP,LOWER_UP> mtu 1500 qdisc noqueue state UP group default qlen 1000
    link/ether 25:54:01:f3:2a:2e brd ff:ff:ff:ff:ff:ff
    inet 192.168.1.12/24 brd 192.168.1.255 scope global noprefixroute virbr0
       valid_lft forever preferred_lft forever
$ ip a show eno1
2: eno1: <BROADCAST,MULTICAST,UP,LOWER_UP> mtu 1500 qdisc fq_codel master virbr0 state UP group default qlen 1000
    link/ether 3c:49:7a:b9:e7:6f brd ff:ff:ff:ff:ff:ff
    altname enp0s31f6
Notice virbr0 is the master of eno1.
Make the changes permanent
$ sudo systemctl restart nmstate
This will rename file 50-create-bridge.yml to 50-create-bridge.applied. To re-apply if changes are needed, rename the file to 50-create-bridge.yml before restarting the service nmstate.
- The VM should use virbr0 as it's network interface. Using Cockpit add a Bridged network to the VM.
image libvirt-bridge.png
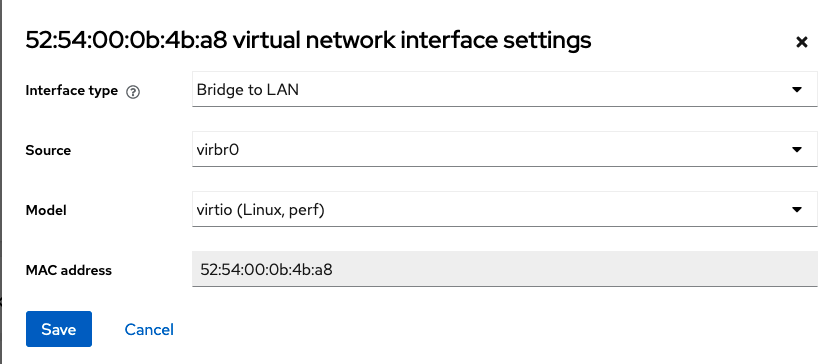
-> OR <- define it using virsh:
$ sudo virsh edit vm_machine
<domain type='kvm'>
~
  <devices>
~
    <interface type='bridge'>
      <mac address='52:54:00:0b:4b:a8'/>
      <source bridge='virbr0'/>
      <model type='virtio'/>
    </interface>
~
Reference:
- https://libvirt.org/formatnetwork.html#using-an-existing-host-bridge
- https://libvirt.org/manpages/virsh.html
- Virtual Machine XML file location: /etc/libvirt/qemu/
Afterwords it will look like this:
$ sudo virsh domiflist vm_machine
 Interface   Type     Source   Model    MAC
-----------------------------------------------------------
 vnet5       bridge   virbr0   virtio   22:53:06:f9:d2:e1
vnet5 is automatically created, with virbr0 as it's master. Typically, a vnet will be added to a bridge interface which means plugging the VM into a switch.
25: vnet5: <BROADCAST,MULTICAST,UP,LOWER_UP> mtu 1500 qdisc noqueue master virbr0 state UNKNOWN group default qlen 1000
    link/ether fe:54:00:f7:d2:40 brd ff:ff:ff:ff:ff:ff
    inet6 fe80::fc54:ff:fef7:d240/64 scope link
       valid_lft forever preferred_lft forever
Physical network interface (eno1) -> bridge (virbr0) <- Virtual network interface (vnet5)
$ bridge link show virbr0
2: eno1: <BROADCAST,MULTICAST,UP,LOWER_UP> mtu 1500 master virbr0 state forwarding priority 32 cost 100
25: vnet5: <BROADCAST,MULTICAST,UP,LOWER_UP> mtu 1500 master virbr0 state forwarding priority 32 cost 100
$ ip link show master virbr0
2: eno1: <BROADCAST,MULTICAST,UP,LOWER_UP> mtu 1500 qdisc fq_codel master virbr0 state UP mode DEFAULT group default qlen 1000
    link/ether 1c:69:7a:09:e7:61 brd ff:ff:ff:ff:ff:ff
    altname enp0s31f6
25: vnet5: <BROADCAST,MULTICAST,UP,LOWER_UP> mtu 1500 qdisc noqueue master virbr0 state UNKNOWN mode DEFAULT group default qlen 1000
    link/ether fe:54:00:f7:d2:40 brd ff:ff:ff:ff:ff:ff
Debian Way
In this host, we have a USB-A to Ethernet dongle. Plugging it in created a network device called enxc87f54935633.
This is important if you need to preserve your existing ethernet connection while configuring a new bridge.
In this example the host IP address will be fixed at 192.168.1.10, and the guest (VM) will pick up a DHCP address from the local DHCP server. Of course you should change the router address (192.168.1.1) and maybe the DNS resolvers (1.1.1.1 and 1.0.0.1). The ethernets (enxc87f54935633) is a USB-A ethernet port. Ethernet enxc87f54935633 will no longer have an IP address, rather bridge interface owns the IP address.
File: /etc/netplan/60-bridge-init.yaml
# sudo apt install bridge-utils -y
# USB-A -> Ethernet: enxc87f54935633
network:
  version: 2
  renderer: networkd

  ethernets:
    enxc87f54935633:
      dhcp4: false
      dhcp6: false

  bridges:
    virbr0:
      interfaces: [enxc87f54935633]
      addresses: [192.168.1.10/24]
      routes:
      - to: default
        via: 192.168.1.1
        metric: 100
        on-link: true
      mtu: 1500
      nameservers:
        addresses: [1.1.1.1]
      parameters:
        stp: true
        forward-delay: 4
      dhcp4: no
      dhcp6: no
It is important to disable the default virbr0 network interface within Cockpit/virsh.
$ sudo virsh net-destroy default
Network default stopped
$ sudo virsh net-autostart --disable default
Network default unmarked as autostarted

$ sudo virsh net-list --all
 Name      State      Autostart   Persistent
----------------------------------------------
 default   inactive   no          yes
Hint: net-destroy only stops the running process ;-)
Apply the bridge network config, fix any errors.
$ sudo netplan apply /etc/netplan/60-bridge-init.yaml
...
Check the interface
$ ip a show virbr0
28: virbr0: <BROADCAST,MULTICAST,UP,LOWER_UP> mtu 1500 qdisc noqueue state UP group default qlen 1000
    link/ether ee:a7:6e:d0:3b:53 brd ff:ff:ff:ff:ff:ff
    inet 10.123.50.63/24 brd 10.123.50.255 scope global virbr0
       valid_lft forever preferred_lft forever
    inet6 fe80::eca7:6eff:fed0:3b53/64 scope link
       valid_lft forever preferred_lft forever
$ ip a show enxc87f54935633
27: enxc87f54935633: <BROADCAST,MULTICAST,UP,LOWER_UP> mtu 1500 qdisc fq_codel master virbr0 state UP group default qlen 1000
    link/ether c8:7f:54:93:56:33 brd ff:ff:ff:ff:ff:ff
Notice virbr0 is the master of enxc87f54935633.
- The VM should use virbr0 as it's network interface. Using Cockpit add a Bridged network to the VM.
image libvirt-bridge.png
-> OR <- define it using virsh:
$ sudo virsh edit vm_machine
<domain type='kvm'>
~
  <devices>
~
    <interface type='bridge'>
      <mac address='52:54:00:0b:4b:a8'/>
      <source bridge='virbr0'/>
      <model type='virtio'/>
    </interface>
~
Reference:
- https://libvirt.org/formatnetwork.html#using-an-existing-host-bridge
- https://libvirt.org/manpages/virsh.html
- Virtual Machine XML file location: /etc/libvirt/qemu/
Afterwords it will look like this:
$ sudo virsh domiflist vm-machine
 Interface   Type     Source   Model    MAC
-----------------------------------------------------------
 vnet13      bridge   virbr0   virtio   51:34:07:0b:4a:a1
vnet13 is automatically created, with virbr0 as it's master.
$ ip a show vnet13
30: vnet13: <BROADCAST,MULTICAST,UP,LOWER_UP> mtu 1500 qdisc noqueue master virbr0 state UNKNOWN group default qlen 1000
    link/ether fe:54:00:0b:4b:a8 brd ff:ff:ff:ff:ff:ff
    inet6 fe80::fc54:ff:fe0b:4ba8/64 scope link
       valid_lft forever preferred_lft forever
Physical network interface (enxc87f54935633) -> bridge (virbr0) <- Virtual network interface (vnet13)
$ sudo brctl show virbr0
bridge name	bridge id		STP enabled	interfaces
virbr0		8000.eea76ed03b53	yes		enxc87f54935633
                                                        vnet13
$ bridge link show virbr0
27: enxc87f54935633: <BROADCAST,MULTICAST,UP,LOWER_UP> mtu 1500 master virbr0 state forwarding priority 32 cost 4
30: vnet13: <BROADCAST,MULTICAST,UP,LOWER_UP> mtu 1500 master virbr0 state forwarding priority 32 cost 100
$ ip link show master virbr0
27: enxc87f54935633: <BROADCAST,MULTICAST,UP,LOWER_UP> mtu 1500 qdisc fq_codel master virbr0 state UP mode DEFAULT group default qlen 1000
    link/ether c8:7f:54:93:56:33 brd ff:ff:ff:ff:ff:ff
30: vnet13: <BROADCAST,MULTICAST,UP,LOWER_UP> mtu 1500 qdisc noqueue master virbr0 state UNKNOWN mode DEFAULT group default qlen 1000
    link/ether fe:54:00:0b:4b:a8 brd ff:ff:ff:ff:ff:ff
Reference:
Sharing files with physical and virtual hosts
- Make a directory on the VM
$ sudo mkdir /data
- In Cockpit on the physical host > Shared directories, add this directory to the Source path, and create a mount tag; i.e.: data
Source path    Mount tag
-------------- ---------
/data/         data
- In the VM update fstab
File: /etc/fstab
~
# virt share :
# mount_tag /mnt/mount/path virtiofs rw,noatime,_netdev 0 0
data /data virtiofs rw,noatime,_netdev 0 0
~
Mount it
$ sudo mount /data
Now the shared filesystem will be mounted upon every VM start.
Alternative: Manual mount
#mount -t virtiofs [mount tag] [mount point]
sudo mount -t virtiofs data /data
Virtual Storage Pools on NFS
The advantages of virtual machine storage pools on NFS are:
- Raid protection on NFS
- Ability to move VM from one host to another without copying data files
- Hardware upgrades, failures and network outages are easier to recover from
To support multiple hosts, the definition files need to be copied and updated on each host in advance:
- The VM definition file, located in /etc/libvirt/qemu/<VM Name>.xml
- The storage pool definition file, located in /etc/libvirt/storage/<storage pool name>.xml
- A virtual bridge definition file, located in /etc/netplan for Ubuntu or /etc/nmstate for RedHat
Define a storage pool at the host level and it will mount the NFS volume when libvirtd systemd process starts.
The Source is your NFS client mount as exposed by the NFS server.
The Target is your local NFS client directory to mount it on.
The Name is what you use with virsh/Cockpit to add Storage Volumes (logical disks) to the VM.
File: /etc/libvirt/storage/my_vm01.xml
<!--
WARNING: THIS IS AN AUTO-GENERATED FILE. CHANGES TO IT ARE LIKELY TO BE
OVERWRITTEN AND LOST. Changes to this xml configuration should be made using:
  virsh pool-edit my_vm_pool
or other application using the libvirt API.
-->

<pool type='netfs'>
  <name>my_vm_pool</name>
  <uuid>7c847772-0565-4d26-a3bc-46e4634fb84f</uuid>
  <capacity unit='bytes'>0</capacity>
  <allocation unit='bytes'>0</allocation>
  <available unit='bytes'>0</available>
  <source>
    <host name='192.168.1.65'/>
    <dir path='/mnt/vol032/vm_data/'/>
    <format type='auto'/>
  </source>
  <target>
    <path>/vm_data/</path>
  </target>
</pool>
Copy or create your Storage Volumes to the dir path on the NFS server, then add them via virsh/Cockpit.
# Create Volume
#
sudo virsh vol-create-as my_vm_pool test_vol2.qcow2 2G
#    my_vm_pool: Is the pool name.
#    test_vol2: This is the name of the volume.
#    2G: This is the storage capacity of the volume.
#
# List volumes
#
$ sudo virsh vol-list --pool my_vm_pool --details
 Name               Path                        Type   Capacity    Allocation
-----------------------------------------------------------------------------
 test_vol02.qcow2   /vm_data/test_vol02.qcow2   file   2.00 GiB    0.65 GiB
Reference:
- /etc/libvirt/storage/<pool name>.xml
- https://access.redhat.com/documentation/en-us/red_hat_enterprise_linux/9/html/configuring_and_managing_virtualization/managing-storage-for-virtual-machines_configuring-and-managing-virtualization#proc_creating-nfs-based-storage-pools-using-the-web-console_assembly_managing-virtual-machine-storage-pools-using-the-web-console*
Clone Virtual Machine
1st clone:
- Create vlan on 1st ethernet adapter (ensure network switch support vlans) [1]
- Add NFS mount, if not already there [2]
- Create nmstate bridge virbr0 on 2nd ethernet adapter (can use USB/Ethernet adapter) [3]
- Re-create 1st adapter as fixed address in nmstate [4]
- Create storage pool as type NFS, using Cockpit [5]
- Import VM, using storage pool data as nfs, using Cockpit
- Delete default VM network using Cockpit
- Create VM network bridge on VM (use host's virbr0), using Cockpit
- Change /etc/nmstate/*.applied to *.yml, reboot to get route working
- Change owner of Storage Volume to libvirtd-qemu for Debian or qemu for RedHat on NAS
It really helps to use a secondary network adapter, because the routing will be lost to the main IP and you have to use the console to get it back. Also one adapter can handle the NFS traffic while the other handles the VM traffic.
-
Fixed IP address; servers should have this
File: /etc/nmstate/40-create-eno1.yml
---
interfaces:
- name: eno1
  type: ethernet
  state: up
  ipv4:
    enabled: true
    address:
    - ip: 192.168.1.12
      prefix-length: 24
    dhcp: false
  ipv6:
    enabled: false

routes:
  config:
  - destination: 0.0.0.0/0
    next-hop-interface: eno1
    next-hop-address: 192.168.1.1

dns-resolver:
  config:
    search:
    - example.com
    server:
    - 1.1.1.1
    - 8.8.8.8
Apply change:
$ sudo nmstatectl apply /etc/nmstate/40-create-eno1.yml
Copy Data Files
Now the easy part.
- Stop the VM on the old host, using Cockpit. Remember to disable autostart!
- Copy the Storage Pool data file(s) to your NFS mount, if not already done.
- Start your VM on the new host, and enjoy!
In the future you can just stop the VM on the old host, then start the new VM on the new host, assuming they are both on NFS..
Remember to disable autostart on the Storage Pool and VM on the old host! If 'Failed to get "write" lock, Is another process using the image [/data_vm/data01]?', make sure other host has stopped VM and storage pool.
$ sudo virsh pool-autostart --disable my_vm01
Pool my_vm01 unmarked as autostarted
If the IP Address changed in the VM
- Copy new SSH keys with new IP address (delete old on remote)
# SSH Copy
$ ssh-copy-id \<remote IP\>

# SSH Delete
$ ssh \<remote IP\> grep -n \<remote IP\> ~/.ssh/known_hosts
2:192.168.1.4 ssh-rsa
# delete line number 2 in file ~/.ssh/known_hosts on host \<remote IP\>
-
Edit apache configuration to reflect new IP address
- File: /etc/httpd/conf/httpd.conf
-
Edit Nextcloud configuration, to add IP address to list of trusted hosts
- File: /var/www/nextcloud/config/config.php
Restart apache to pick up changes
sudo systemctl restart httpd
Configuration Files
/etc/libvirt
├── hooks
├── libvirt-admin.conf
├── libvirt.conf
├── libvirtd.conf
├── libxl.conf
├── libxl-lockd.conf
├── libxl-sanlock.conf
├── lxc.conf
├── nwfilter
│   ├── allow-arp.xml
│   ├── allow-dhcp-server.xml
│   ├── allow-dhcpv6-server.xml
│   ├── allow-dhcpv6.xml
│   ├── allow-dhcp.xml
│   ├── allow-incoming-ipv4.xml
│   ├── allow-incoming-ipv6.xml
│   ├── allow-ipv4.xml
│   ├── allow-ipv6.xml
│   ├── clean-traffic-gateway.xml
│   ├── clean-traffic.xml
│   ├── no-arp-ip-spoofing.xml
│   ├── no-arp-mac-spoofing.xml
│   ├── no-arp-spoofing.xml
│   ├── no-ip-multicast.xml
│   ├── no-ip-spoofing.xml
│   ├── no-ipv6-multicast.xml
│   ├── no-ipv6-spoofing.xml
│   ├── no-mac-broadcast.xml
│   ├── no-mac-spoofing.xml
│   ├── no-other-l2-traffic.xml
│   ├── no-other-rarp-traffic.xml
│   ├── qemu-announce-self-rarp.xml
│   └── qemu-announce-self.xml
├── qemu
│   ├── autostart
│   │   └── my_vm01.xml -> /etc/libvirt/qemu/my_vm01.xml
│   ├── my_vm01.xml
│   ├── my_vm02.xml
│   ├── networks
│   │   ├── autostart
│   │   └── default.xml
│   └── test_vm42.xml
├── qemu.conf
├── qemu-lockd.conf
├── qemu-sanlock.conf
├── secrets
├── storage
│   ├── autostart
│   │   └── my_vm01.xml -> /etc/libvirt/storage/my_vm01.xml
│   ├── my_vm01.xml
│   └── my_vm02.xml
├── virtlockd.conf
└── virtlogd.conf

9 directories, 45 files
June - Virtual Machines - Linux in the House - https://linux-in-the-house.org
