Home Assistant
- Plug in Zooz S2 stick 700
- Install Software
- Configuration for other Zooz products
- Upgrade
- Lights for WALL-E
- Lights_for_Wall-E.png
- Circuit
- Z-Wave Devices
- Purge
- Continue
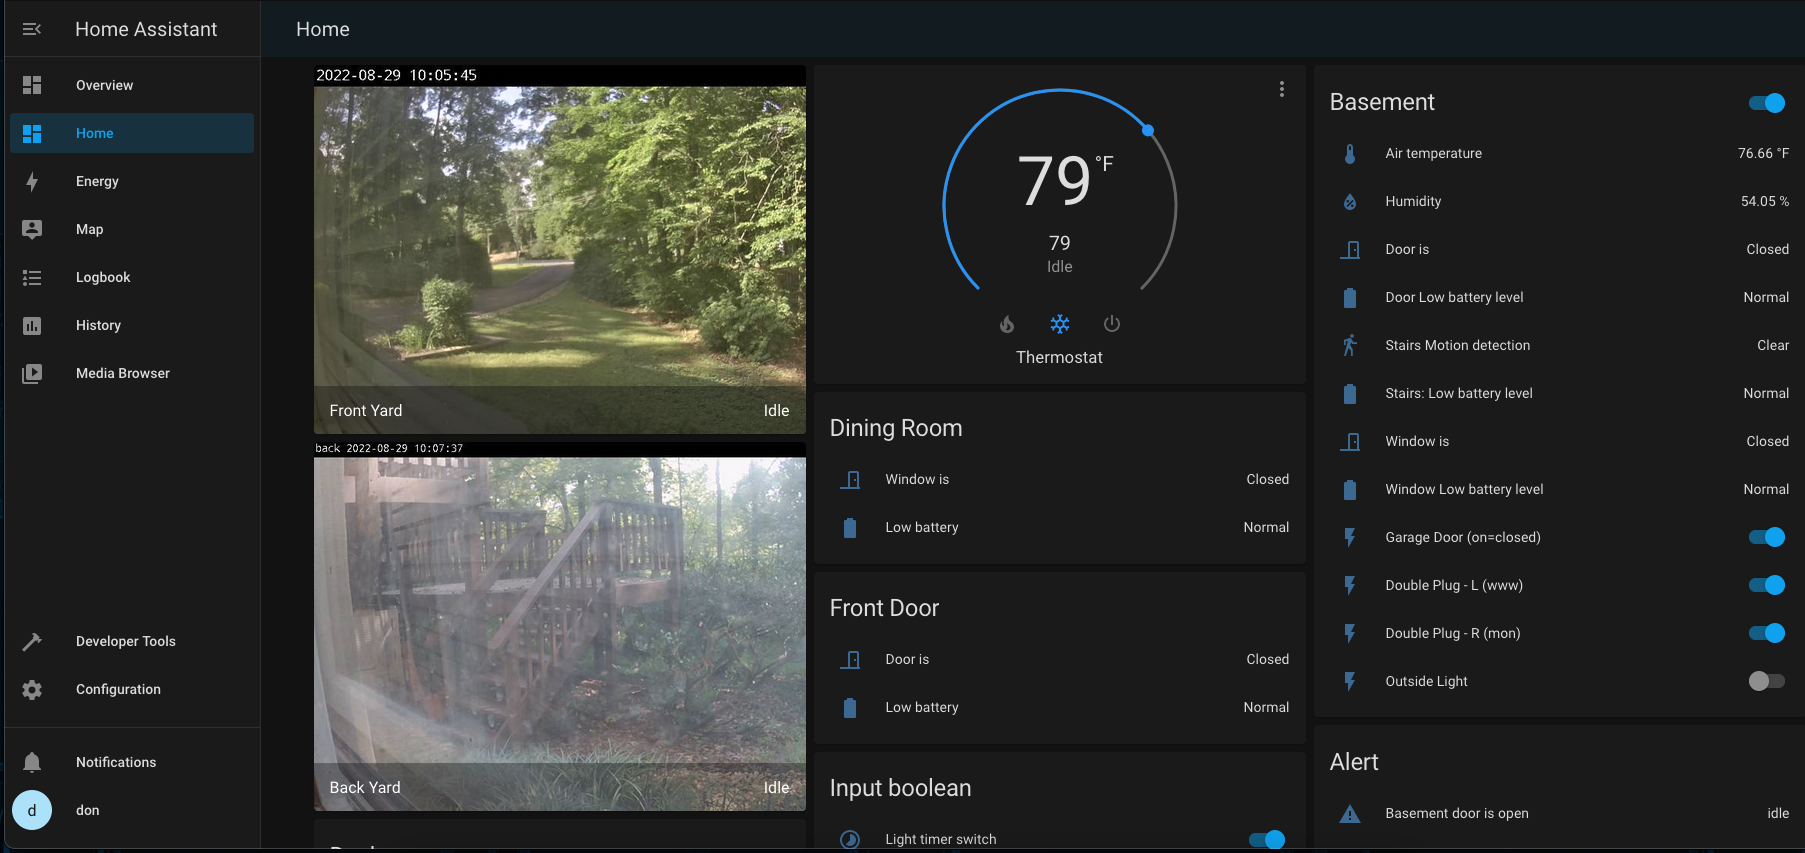
This is a web based interface for automating things around the home. It can monitor doors, windows, motion detection and turn electrical things on and off.
The server software is in two pieces, Z-Wave JS and HASS. Z-Wave (nodejs) reads a USB stick and manages the connection and commands to various Z-WAVE compatible wireless devices. HASS (python) displays and automates monitoring and reacting to the devices by communication to Z-Wave over the WebSocket service (ws://localhost:3000). I install and run the docker images of these packages.
graph TD;
        Home-Assist<-- ws -->Z-Wave-JS-UI;
        Home-Assist<-- ip -->Camera;
        Home-Assist<-- ip -->TV;
        Home-Assist<-- ip -->Receiver;
        Z-Wave-JS-UI<-->USB-Stick;
        USB-Stick<-. zw .->Window-Alarm;
        USB-Stick<-. zw .->Door-Alarm;
        USB-Stick<-. zw .->Thermostat;
        USB-Stick<-. zw .->Light-Switch;
        USB-Stick<-. zw .->Motion-Detector;
- ws: WebSocket
- ip: TCP/IP
- zw: Z-Wave
Reference:
Plug in Zooz S2 stick 700
This is a USB radio for wireless communication to the Z-Wave family of home automation devices.
Like:
- light switch
- door alarm
- window alarm
- motion detector
- thermostat
Model (US): ZST10-700; US Frequency Band: 908.42 MHz; Z-Wave Plus: USB-A [1]
Find the name of the device for the USB Stick. Here it is '/dev/ttyUSB0'.
# from dmesg
[1464395.479270] usb 1-2: new full-speed USB device number 5 using xhci_hcd
[1464395.630085] usb 1-2: New USB device found, idVendor=10c4, idProduct=ea60, bcdDevice= 1.00
[1464395.630087] usb 1-2: New USB device strings: Mfr=1, Product=2, SerialNumber=3
[1464395.630088] usb 1-2: Product: CP2102N USB to UART Bridge Controller
[1464395.630090] usb 1-2: Manufacturer: Silicon Labs
[1464395.630091] usb 1-2: SerialNumber: f85326c6843ee812862437bcf28b3e41
[1464395.666277] usbcore: registered new interface driver usbserial_generic
[1464395.666283] usbserial: USB Serial support registered for generic
[1464395.667654] usbcore: registered new interface driver cp210x
[1464395.667665] usbserial: USB Serial support registered for cp210x
[1464395.667689] cp210x 1-2:1.0: cp210x converter detected
[1464395.670018] usb 1-2: cp210x converter now attached to ttyUSB0
$ lsusb
Bus 002 Device 001: ID 1d6b:0003 Linux Foundation 3.0 root hub
Bus 001 Device 004: ID 8087:0a2b Intel Corp.
Bus 001 Device 003: ID 046d:c016 Logitech, Inc. Optical Wheel Mouse
Bus 001 Device 005: ID 10c4:ea60 Silicon Labs CP210x UART Bridge <--- this is it
Bus 001 Device 001: ID 1d6b:0002 Linux Foundation 2.0 root hub
$ ls -l /dev/ttyUSB0
crw-rw---- 1 root dialout 188, 0 Aug 11 08:22 /dev/ttyUSB0
Reference:
Install Software
Option (1): TrueNAS App
If you already have TrueNAS installed this is a much easier option. I run HA on TrueNAS Scale (Linux Debian) now. If your TrueNAS never moves from the HA device location, this makes even more sense than, say, a laptop.
(1) App for Home-Assistant
Home-Assistant is software to show and control your devices, and perform automation.
-
Using the TrueNAS web interface, select Apps.
-
In the Tab, select Available Applilcations.
-
Select the home-assistant app. Then select:
- timezone
- under Storage, check Host Path and navagate to a spot on your NAS filesystem where you want your configuration.yaml, the input field is called Host Path for Home Assistant Configuration Storage Volume EX:
/mnt/vol042/ha/hass - it should pick an open port for you, larger than 9001
- save, and Navigate your browser to the Home-Assistant console : <http://localhost:<port>/control-panel> and create a new login.
TrueNAS App puts event and statistics data in a postgresql database [1], instead of sqlite (the default).
Access the database from the App menu (3 dots), then Shell.
# psql  -U postgres -d homeassistance
psql (13.1 (Debian 13.1-1.pgdg100+1))
Type "help" for help.

homeassistance=# \dt
                 List of relations
 Schema |         Name          | Type  |  Owner
--------+-----------------------+-------+----------
 public | event_data            | table | postgres
 public | event_types           | table | postgres
 public | events                | table | postgres
 public | recorder_runs         | table | postgres
 public | schema_changes        | table | postgres
 public | state_attributes      | table | postgres
 public | states                | table | postgres
 public | states_meta           | table | postgres
 public | statistics            | table | postgres
 public | statistics_meta       | table | postgres
 public | statistics_runs       | table | postgres
 public | statistics_short_term | table | postgres
(12 rows)

homeassistance=# select count(*) from events;
 count
-------
  4470
(1 row)

homeassistance=# \q
# exit
Your Home-Assistant install will look for a configuration file in the docker /config directory. You can find it here [2]:
$ sudo docker ps --filter="name=home-assistant"|head -2
CONTAINER ID   IMAGE                          COMMAND                  CREATED        STATUS        PORTS     NAMES
b87237af7a25   homeassistant/home-assistant   "/init"                  11 hours ago   Up 11 hours             k8s_home-assistant_home-assistant-d88b55479-rsgpb_ix-home-assistant_11a62bf0-b8e2-4108-a597-1a6c448dd01d_0

# Use the NAMES and grep for config
$ sudo docker container inspect   k8s_home-assistant_home-assistant-d88b55479-rsgpb_ix-home-assistant_11a62bf0-b8e2-4108-a597-1a6c448dd01d_0 |grep config
                "/mnt/vol042/ha/hass:/config",
                "Destination": "/config",
            "WorkingDir": "/config",
The port number is here
$ sudo docker container inspect   k8s_home-assistant_home-assistant-d88b55479-rsgpb_ix-home-assistant_11a62bf0-b8e2-4108-a597-1a6c448dd01d_0 |grep HOME_ASSISTANT_PORT=
                "HOME_ASSISTANT_PORT=tcp://172.17.216.154:22401",
Just ignore the 172... IP Address, it is only for internal docker. A bridge network makes it available to the Host's public IP Address. This example port number is 22401, so I would put into my browser : http://localhost:22401/. You may need to substitute localhost with your public IP Address.
Reference:
- https://www.home-assistant.io/integrations/recorder/
- https://docs.docker.com/engine/reference/commandline/ps/
(1) Daemon to run ZWave-JS-UI
ZWave-JS-UI is a node application to interface with the USB stick and Home Assistant.
- Move to one level below your Host Path designated above for Home-Assistant (EX:
/mnt/vol042/ha), and install ZWave-JS-UI [1]
$ mkdir zwave-js-ui
$ cd zwave-js-ui
# download latest version
$ curl -s https://api.github.com/repos/zwave-js/zwave-js-ui/releases/latest  \
| grep "browser_download_url.*zip" \
| cut -d : -f 2,3 \
| tr -d \" \
| wget -i -

unzip zwave-js-ui-v*.zip
Put zwave-run.sh in TrueNAS > System > Advanced > Init/Shutdown Scripts ... with POSTINIT
File: zwave-run.sh
#!/bin/bash
DIR=/mnt/vol042/ha
LOG=zwave-run.log
#
cd ${DIR}
nohup sudo ${DIR}/zwave-js-ui-linux >> ${DIR}/${LOG} 2>&1 &
Navigate your browser to Z_Wave-JS-UI console : http://localhost:8091/control-panel and perform the Z_Wave-JS-UI setup [1]. You may need to substitute localhost with your public IP Address.
I disabled MQTT to get rid of
Error: connect ECONNREFUSEDmessages in the debug log window of ZWave-JS-UI, since the HA to ZWAV communication is done via WebSockets (ws://localhost:3000).
Reference:
(1) Skip Option (2) and proceed to section -> Configuration for other Zooz products
Option (2): Docker Package Install
This option installs and runs two docker images, one for Home-Assistant, and another for ZWave-JS-UI.
$ sudo apt-get update

$ sudo apt-get install \
    ca-certificates \
    curl \
    gnupg \
    lsb-release
(2) Install Docker Engine on Ubuntu
Follow the latest guide here:
https://docs.docker.com/engine/install/ubuntu/
Make sure you are about to install Comunity Edition (ce) from the Docker repo instead of the default Ubuntu repo by adding Docker’s official GPG key, before setting up the repository
$ sudo apt-get install docker-ce docker-ce-cli containerd.io

$ sudo systemctl status docker
FYI: Docker download OS selection: https://download.docker.com/linux/
centos/
debian/
fedora/
raspbian/
rhel/
sles/
static/
ubuntu/
(2) Run Docker to Install homeassistant
May need to run docker with the
--initparameter first. Then stop and restart without init.
export HOME=$(pwd)
$ sudo usermod -aG docker $USER
$ docker run -d \
  --name homeassistant \
  --restart=always \
  -v /etc/localtime:/etc/localtime:ro \
  -v ${HOME}/hass:/config \
  --device /dev/ttyUSB0:/dev/ttyUSB0 \
  -e "DISABLE_JEMALLOC=true" \
  --network=host \
  -p 3000 \
  homeassistant/home-assistant:stable
#
# To Remove and re-install:
docker: Error response from daemon: Conflict.
The container name "/homeassistant" is already in use by container "5113815f15cb79a0ea19f1888e6efdd39aa9108c60675fe10b515aa162c2e72b".
You have to remove (or rename) that container to be able to reuse that name.
See 'docker run --help'.

# docker stop 5113815f15cb79a0ea19f1888e6efdd39aa9108c60675fe10b515aa162c2e72b
5113815f15cb79a0ea19f1888e6efdd39aa9108c60675fe10b515aa162c2e72b

# docker rm 5113815f15cb79a0ea19f1888e6efdd39aa9108c60675fe10b515aa162c2e72b
5113815f15cb79a0ea19f1888e6efdd39aa9108c60675fe10b515aa162c2e72b
(2) Run Z-Wave JS Server
Create a new directory for the zwave-js server configuration files
export HOME=$(pwd)
$ sudo mkdir ${HOME}/zwavejs
Run the docker container (the first port listed is for the Z-Wave JS Web Interface, the second port is the Z-Wave JS WebSocket listener)
May need to run docker with the
--initparameter first. Then stop and restart without init.
$ sudo docker run -d --restart=always -p 8091:8091 -p 3000:3000 --device=/dev/ttyUSB0 --name="zwave-js" -e "TZ=America/NewYork" -v ${HOME}/zwavejs:/usr/src/app/store zwavejs/zwavejs2mqtt:latest
(2) Check Docker Status
# docker ps
CONTAINER ID   IMAGE                                 COMMAND                  CREATED          STATUS          PORTS                                                                                  NAMES
d977c2674a80   homeassistant/home-assistant:stable   "/init"                  24 minutes ago   Up 24 minutes                                                                                          homeassistant
99769272d748   zwavejs/zwavejs2mqtt:latest           "docker-entrypoint.s…"   42 minutes ago   Up 42 minutes   0.0.0.0:3000->3000/tcp, :::3000->3000/tcp, 0.0.0.0:8091->8091/tcp, :::8091->8091/tcp   zwave-js
(2) Move Container/Image to SSD (/data)
Put this file in /etc/docker/daemon.json:
File: daemon.json
{
   "data-root": "/data/docker"
}
Stop docker
$ sudo service docker stop
Make dorectory, copy files into it, change the old name
$ mkdir /data/docker

$ sudo rsync -aP /var/lib/docker/ /data/docker

$ sudo mv /var/lib/docker /var/lib/docker.old
Ready to start on the new directory
$ sudo service docker start
test . test . test . test . test .
Then:
$ sudo rm -rf /var/lib/docker.old
(2) Default Route was getting messed up with docker
So changed NetworkInterfaceBlacklist in connman main.cf file as follows:
[General]
PreferredTechnologies=ethernet,wifi
SingleConnectedTechnology=false
AllowHostnameUpdates=false
PersistentTetheringMode=true
NetworkInterfaceBlacklist=SoftAp0,usb0,usb1,vmnet,vboxnet,virbr,ifb,veth-,vb-
Used to be:
NetworkInterfaceBlacklist=SoftAp0,usb0,usb1
...
Then restart connman:
$ sudo systemctl restart connman
Reference: https://stackoverflow.com/questions/62176803/docker-is-overriding-my-default-route-configuration
(2) Restarting
::::::::::::::
homeassistant_restart.sh
::::::::::::::
#homeassistant_restart.sh
sudo docker restart homeassistant

::::::::::::::
homeassistant_shell.sh
::::::::::::::
docker exec -it homeassistant bash

::::::::::::::
docker_start.sh
::::::::::::::
#!/bin/bash
TMP=$(mktemp)
sudo systemctl start docker
#
./docker_status.sh
#
sudo docker ps -a | while read CONTAINER
do
 awk '$NF ~ /^zwave-js/ || $NF ~ /^homeassistant/' >> ${TMP}
done
#
while read LINE
do
 echo ${LINE} | awk '{print "Container " $1 " is " $NF}'
 sudo docker container start $(echo ${LINE} | awk '{print $1}')
done <${TMP}
#
./docker_status.sh
#
rm ${TMP}

::::::::::::::
docker_status.sh
::::::::::::::
#!/bin/bash
sudo docker ps

::::::::::::::
docker_stop.sh
::::::::::::::
#!/bin/bash
#------------------------
# File: docker_stop.sh
#------------------------
./docker_status.sh
sudo docker container ls --quiet | while read CONTAINER
do
 echo "Stopping container $CONTAINER"
 sudo docker container stop $CONTAINER
done
sudo systemctl stop docker
Configuration for other Zooz products
File: ${HOME}/hass/configuration.yaml
# Sun
homeassistant:
  time_zone: America/New_York

# Configure a default setup of Home Assistant (frontend, api, etc)
default_config:

# Text to speech
tts:
  - platform: google_translate

shell_command:
  sms_light_off:              /config/script.sh Outside light off
  sms_light_on:               /config/script.sh Outside light on
  sms_motion_on:              /config/script.sh Outside motion on
  sms_garage_open:            /config/script.sh Garage door open
  sms_garage_closed:          /config/script.sh Garage door closed
  sms_basement_door_open:     /config/script.sh Basement door open
  sms_basement_door_closed:   /config/script.sh Basement door closed
  sms_basement_window_open:   /config/script.sh Basement window open
  sms_basement_window_closed: /config/script.sh Basement window closed
  sms_dining_window_open:     /config/script.sh Dining room window open
  sms_dining_window_closed:   /config/script.sh Dining room window closed
  sms_front_door_open:        /config/script.sh Front door open
  sms_front_door_closed:      /config/script.sh Front door closed
  sms_sliding_door_open:      /config/script.sh Sliding door open
  sms_sliding_door_closed:    /config/script.sh Sliding door closed

group: !include groups.yaml
automation: !include automations.yaml
script: !include scripts.yaml
scene: !include scenes.yaml


# E-mail
#notify:
#  - name: "NOTIFIER_NAME"
#    platform: smtp
#    sender: "YOUR_SENDER"
#    recipient: "YOUR_RECIPIENT"
notify:
  - name: "my_email"
    platform: smtp
    server: "192.168.1.5"
    port: 25
    timeout: 15
    sender: "me@example.com"
    encryption: starttls
    username: "me@example.com"
    recipient:
      - "me@example.com"
    sender_name: "My Home Assistant"
  - name: "my_page"
    platform: smtp
    server: "192.168.1.5"
    port: 25
    timeout: 15
    sender: "me@example.com"
    encryption: starttls
    username: "me@example.com"
    recipient:
      - "5551212@phonecompany.net"
    sender_name: "Home Assist"

#
# Example configuration.yaml entry
alert:
  basement_door:
    name: Basement door is open
    done_message: Basement door is closed
    entity_id: binary_sensor.basement_door_dwzwave25_access_control_window_door_is_open
    state: "on"
    repeat: 30
    can_acknowledge: true
    skip_first: false
    notifiers:
      - my_email
  basement_window:
    name: Basement window is open
    done_message: Basement window is closed
    entity_id: binary_sensor.basement_window_dwzwave25_access_control_window_door_is_open
    state: "on"
    repeat: 30
    can_acknowledge: true
    skip_first: false
    notifiers:
      - my_email
#     - my_page
  sliding_door:
    name: Sliding door is open
    done_message: Sliding door is closed
    entity_id: binary_sensor.sliding_door_dwzwave25_access_control_window_door_is_open
    state: "on"
    repeat: 30
    can_acknowledge: true
    skip_first: false
    notifiers:
      - my_email
#      - my_page
  dining_window:
    name: Dining window is open
    done_message: Dining window is closed
    entity_id: binary_sensor.dining_room_window_dwzwave25_access_control_window_door_is_open
    state: "on"
    repeat: 30
    can_acknowledge: true
    skip_first: false
    notifiers:
      - my_email
#      - my_page
  front_door:
    name: Front Door is open
    done_message: Front Door is closed
    entity_id: binary_sensor.front_door_dwzwave25_access_control_window_door_is_open
    state: "on"
    repeat: 30
    can_acknowledge: true
    skip_first: false
    notifiers:
      - my_email
#     - my_page
  garage_door:
    name: garage door is open
    done_message: garage door is closed
    entity_id: switch.garage_door_relay_zen16_2_2
    state: "off"
    repeat: 30
    can_acknowledge: true
    skip_first: false
    notifiers:
      - my_email
#      - my_page

# Switch Timer
input_number:
  light_timer_minutes:
    name: "Light Timer"
    min: 0
    max: 30
    step: 1
input_boolean:
  light_timer_enabled:
    name: "Light timer switch"
    initial: on
    icon: mdi:timelapse
Configuration script from configuration.yaml
Log file will be picked up by script ${HOME}/matrix/sendmatrix.sh.
NOTE: '/config' in docker is actually ${HOME}/hass, see script comments inside sendmatrix.sh
$ cat ${HOME}/hass/script.sh
#!/bin/bash
echo "${@} - $(date)" >>  /config/sendsms.log
Sendmatrix script
File: ${HOME}/matrix/sendmatrix.sh
#!/bin/bash
#----------------------------------------------------
# File: sendmatrix.sh
#
# Usage: sendmatrix.sh
#
# Purpose: Watch for new lines in a homeassistant (hass)
#  file (${HOME}/hass/sendmatrix.log) and send an matrix
#  message with those new line(s)
#
# Dependencies:
#  - sudo apt-get install sendmatrix
#  - sudo apt-get install inotifywait
#  - retail : git clone https://github.com/mbucc/retail
#  - NOTE: Docker configures / as /config for homeassistant
#          and ${HOME}/hass is /
#  - ${HOME}/hass/configuration.yaml
#       ~
#       shell_command:
#         xmpp_light_off: /config/script.sh Outside light off
#       ~
#  - ${HOME}/hass/automations.yaml
#       ~
#       - service: shell_command.xmpp_light_off
#       ~
#  - ${HOME}/hass/script.sh
#       #!/bin/bash
#       echo "${@} - $(date)" >>  /config/sendxmpp.log
#
# Date     Author     Description
# ----     ------     -----------
# Sep-2021 Don Cohoon Created
#----------------------------------------------------
HOME=${HOME}

# configure hass interface
DIR=${HOME}/wave
OFFSET=${DIR}/sendmatrix.cnt
RESULT=${DIR}/sendmatrix.txt
MSGS=${DIR}/hass/sendsms.log
LOG=${DIR}/sendmatrix.log

#
date >> ${LOG}
# monitor mode, look for file ${MSGS} modification
/usr/bin/inotifywait -m -e modify ${MSGS} 2>&1 | while read line
do
  echo "$(date) - $line"  >> ${LOG}
  # grab any hass script.sh new lines since last time
  /usr/local/bin/retail -T ${OFFSET} ${MSGS} > ${RESULT}
  if [ ! -s "${RESULT}" ]; then
    rm ${RESULT}
  else
    # send text message to phone
    /bin/cat ${RESULT} | /usr/local/bin/matrix-commander.py >>${LOG} 2>&1
    # nextcloud talk integration
    MSG=$(/bin/cat ${RESULT})
    ${HOME}/nextcloud/talk_mattermost.sh "${MSG}"
    #
    /bin/cat ${RESULT} >>${LOG} 2>&1
    date >> ${LOG}
  fi
done
Automation
Most of this configuration is done through the web interface: https://localhost:8123
File: ${HOME}/hass/automation.yaml
- id: 380e45ccb4934558ba07d3069830d3d2
  alias: light timer
  trigger:
  - platform: state
    entity_id: switch.light_switch_zen23
    to: 'on'
  condition:
  - condition: state
    entity_id: input_boolean.light_timer_enabled
    state: 'on'
  action:
  - delay:
      minutes: '{{ states(''input_number.light_timer_minutes'') | int }}'
  - service: switch.turn_off
    data: {}
    target:
      entity_id: switch.light_switch_zen23
  - service: shell_command.sms_light_off
  mode: single
- id: '1625258268930'
  alias: Motion Light On
  description: Turn on outside light switch when motion is detected after sunset and
    before sunrise
  trigger:
  - type: motion
    platform: device
    device_id: eeacc9737cf7b1b303418213aed42535
    entity_id: binary_sensor.outside_motion_zse29_home_security_motion_detection
    domain: binary_sensor
  condition:
  - type: is_illuminance
    condition: device
    device_id: eeacc9737cf7b1b303418213aed42535
    entity_id: sensor.outside_motion_zse29_illuminance
    domain: sensor
    below: 150
  action:
  - type: turn_on
    device_id: d2e00f0815ff683a320e28e41ee73ea5
    entity_id: switch.light_switch_zen23
    domain: switch
  - service: shell_command.sms_motion_on
  mode: single
- id: '1628798611219'
  alias: bedroom-alarm
  description: Turn Bedroom Double Switch on at a certain time
  trigger:
  - platform: time
    at: 06:00:00
  condition: []
  action:
  - type: turn_on
    device_id: 92a0858e5012690e2415f47ea4fb122c
    entity_id: switch.double_plug_zen25_bedroom
    domain: switch
  mode: single
- id: '1630351746501'
  alias: Garage Door Open
  description: Garage door open sms message
  trigger:
  - platform: device
    type: turned_off
    device_id: 074e290829b5399ed65b48c792f4f25b
    entity_id: switch.garage_door_relay_zen16_2_2
    domain: switch
  condition: []
  action:
  - service: shell_command.sms_garage_open
  mode: single
- id: '1630351876006'
  alias: Garage door closed
  description: Garage door closed sms message
  trigger:
  - platform: device
    type: turned_on
    device_id: 074e290829b5399ed65b48c792f4f25b
    entity_id: switch.garage_door_relay_zen16_2_2
    domain: switch
  condition: []
  action:
  - service: shell_command.sms_garage_closed
  mode: single
- id: '1631388354084'
  alias: Basement Door Open
  description: Basement Door Open sms message
  trigger:
  - type: opened
    platform: device
    device_id: f618398c8bdf0bce74b6c9a81b822da5
    entity_id: binary_sensor.basement_door_dwzwave25_access_control_window_door_is_open
    domain: binary_sensor
  condition: []
  action:
  - service: shell_command.sms_basement_door_open
  mode: single
- id: '1631388422907'
  alias: Basement Door Closed
  description: Basement Door Closed sms message
  trigger:
  - type: not_opened
    platform: device
    device_id: f618398c8bdf0bce74b6c9a81b822da5
    entity_id: binary_sensor.basement_door_dwzwave25_access_control_window_door_is_open
    domain: binary_sensor
  condition: []
  action:
  - service: shell_command.sms_basement_door_closed
  mode: single
- id: '1631389804064'
  alias: Basement Window Open
  description: Basement Window Open sms message
  trigger:
  - type: opened
    platform: device
    device_id: 563036dd16828af53955fa8eb0d4c4bf
    entity_id: binary_sensor.basement_window_dwzwave25_access_control_window_door_is_open
    domain: binary_sensor
  condition: []
  action:
  - service: shell_command.sms_basement_window_open
  mode: single
- id: '1631389885679'
  alias: Basement Window Closed
  description: Basement Window Closed sms message
  trigger:
  - type: not_opened
    platform: device
    device_id: 563036dd16828af53955fa8eb0d4c4bf
    entity_id: binary_sensor.basement_window_dwzwave25_access_control_window_door_is_open
    domain: binary_sensor
  condition: []
  action:
  - service: shell_command.sms_basement_window_closed
  mode: single
- id: '1631389952499'
  alias: Dining Room Window Open
  description: Dining Room Window Open sms message
  trigger:
  - type: opened
    platform: device
    device_id: 2b803cd86b266ee0d15b1b00c3160b57
    entity_id: binary_sensor.dining_room_window_dwzwave25_access_control_window_door_is_open
    domain: binary_sensor
  condition: []
  action:
  - service: shell_command.sms_dining_window_open
  mode: single
- id: '1631390010729'
  alias: Dining Room Window Closed
  description: Dining Room Window Closed sms message
  trigger:
  - type: not_opened
    platform: device
    device_id: 2b803cd86b266ee0d15b1b00c3160b57
    entity_id: binary_sensor.dining_room_window_dwzwave25_access_control_window_door_is_open
    domain: binary_sensor
  condition: []
  action:
  - service: shell_command.sms_dining_window_closed
  mode: single
- id: '1631390253290'
  alias: Front Door Open
  description: Front Door Open sms message
  trigger:
  - type: opened
    platform: device
    device_id: 8df9b7813be834e418cf5d35165114b1
    entity_id: binary_sensor.front_door_dwzwave25_access_control_window_door_is_open
    domain: binary_sensor
  condition: []
  action:
  - service: shell_command.sms_front_door_open
  mode: single
- id: '1631390320024'
  alias: Front Door Closed
  description: Front Door Closed sms message
  trigger:
  - type: not_opened
    platform: device
    device_id: 8df9b7813be834e418cf5d35165114b1
    entity_id: binary_sensor.front_door_dwzwave25_access_control_window_door_is_open
    domain: binary_sensor
  condition: []
  action:
  - service: shell_command.sms_front_door_closed
  mode: single
- id: '1631390388999'
  alias: Sliding Door Open
  description: Sliding Door Open sms message
  trigger:
  - type: opened
    platform: device
    device_id: 3c2bfde83e328e220ee10dbd3b2f3085
    entity_id: binary_sensor.sliding_door_dwzwave25_access_control_window_door_is_open
    domain: binary_sensor
  condition: []
  action:
  - service: shell_command.sms_sliding_door_open
  mode: single
- id: '1631390452432'
  alias: Sliding Door Closed
  description: Sliding Door Closed sms  message
  trigger:
  - type: not_opened
    platform: device
    device_id: 3c2bfde83e328e220ee10dbd3b2f3085
    entity_id: binary_sensor.sliding_door_dwzwave25_access_control_window_door_is_open
    domain: binary_sensor
  condition: []
  action:
  - service: shell_command.sms_sliding_door_closed
  mode: single
Upgrade
Option: TrueNAS
- Homeassistant app can be updated using TrueNAS app screen, 3 dot menu in the home-assistant app.
- Z-Wave-JS-UI latest can re downloaded.
Option: Docker
You can find the latest, stable, and development builds on docker hub here: https://hub.docker.com/u/homeassistant
During the upgrade your devices will continue to work fine, but please note any automations or access to the application will not be available, so it’s recommended to do this during a time that you know no automations will be running.
Validate your current version
Navigate to the Developer Tools section of Home Assistant. Here you can validate the latest version you currently have deployed.
File: docker_upgrade.sh
#!/bin/bash
#####################################################################
#
# File: docker_upgrade.sh
#
# Usage: sudo ./docker_upgrade.sh
#
# Purpose: Keep HomeAssistant up to date
#
# Dependencies: homeassistant and zwave-js are installed via docker
#  Z-Wave USB device may be different
#  Time zone may be different
#
# Process:
#   1. Stop the current container
#   2. Delete it
#   3. Pull the new container from the docker hub
#   4. Run the container again
#
# The config directory is not in the container, so it remains untouched.
#
# NOTE: Do this every time a new version of HA is released.
#
# History:
#
#   Who    When    Why
# -------- ------- --------------------------------------------------
# Don Cohoon  Dec 2022  Created from many, many, notes and searches
#                        wish I took better notes to give credit.
#####################################################################
HOME=$(pwd)
#
function homeassistant_upgrade() {
 docker stop homeassistant
 docker rm homeassistant
 docker pull homeassistant/home-assistant
 docker run -d \
   --name homeassistant \
   --restart=always \
   -v /etc/localtime:/etc/localtime:ro \
   -v ${HOME}/hass:/config \
   --device /dev/ttyUSB0:/dev/ttyUSB0 \
   -e "DISABLE_JEMALLOC=true" \
   --network=host \
   -p 3000 \
   homeassistant/home-assistant:stable
}
#####################################################################
function zwavejs_upgrade() {
 docker stop zwave-js
 docker rm zwave-js
 docker pull zwavejs/zwavejs2mqtt
 sudo docker run -d \
  --restart=always  \
  -p 8091:8091 \
  -p 3000:3000 \
  --device=/dev/ttyUSB0 \
  --name="zwave-js" \
  -e "TZ=America/NewYork" \
  -v ${HOME}/zwavejs:/usr/src/app/store zwavejs/zwavejs2mqtt:latest
}
#####################################################################
ID=$(id -un)
#
if [ ${ID} != "root" ]; then
  echo "ERROR: Must be run as root"
  exit 1
fi
#
# homeassistant upgrade
#
homeassistant_upgrade
#
# zwave-js upgrade
#
zwavejs_upgrade
Validate your new version number
After a few minutes, navigate back to the Developers Tools page. Upon load, you should now be on the latest version of Home Assistant.
More docker commands are in my Docker blog for January 2023
Lights for WALL-E
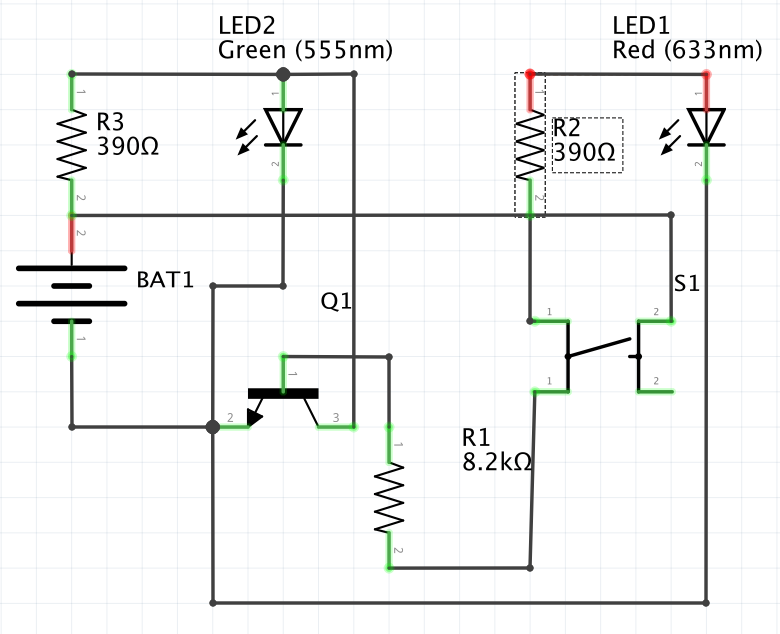
The relay module ZEN16 is wired to a switch on the garage door. When it is open a red light is displayed on Wall-E, when the door is closed a green light is shown.

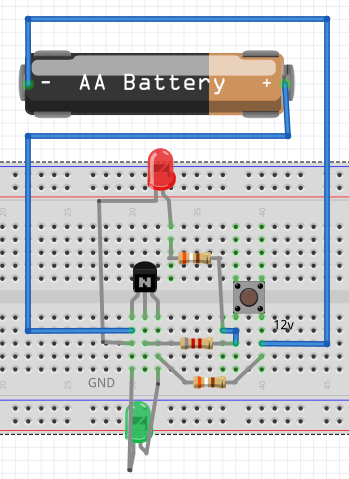
A USB charger is used to supply 5 volts DC (BAT1) to the circuit. Circuit switch S1 is connected to the ZEN16 relay R2 connection. Q1 is a 2N2222 transistor. A closed circuit supplies voltage to LED2, open circuit supplies voltage to LED1.
Here is the electrical diagram for that:
Circuit
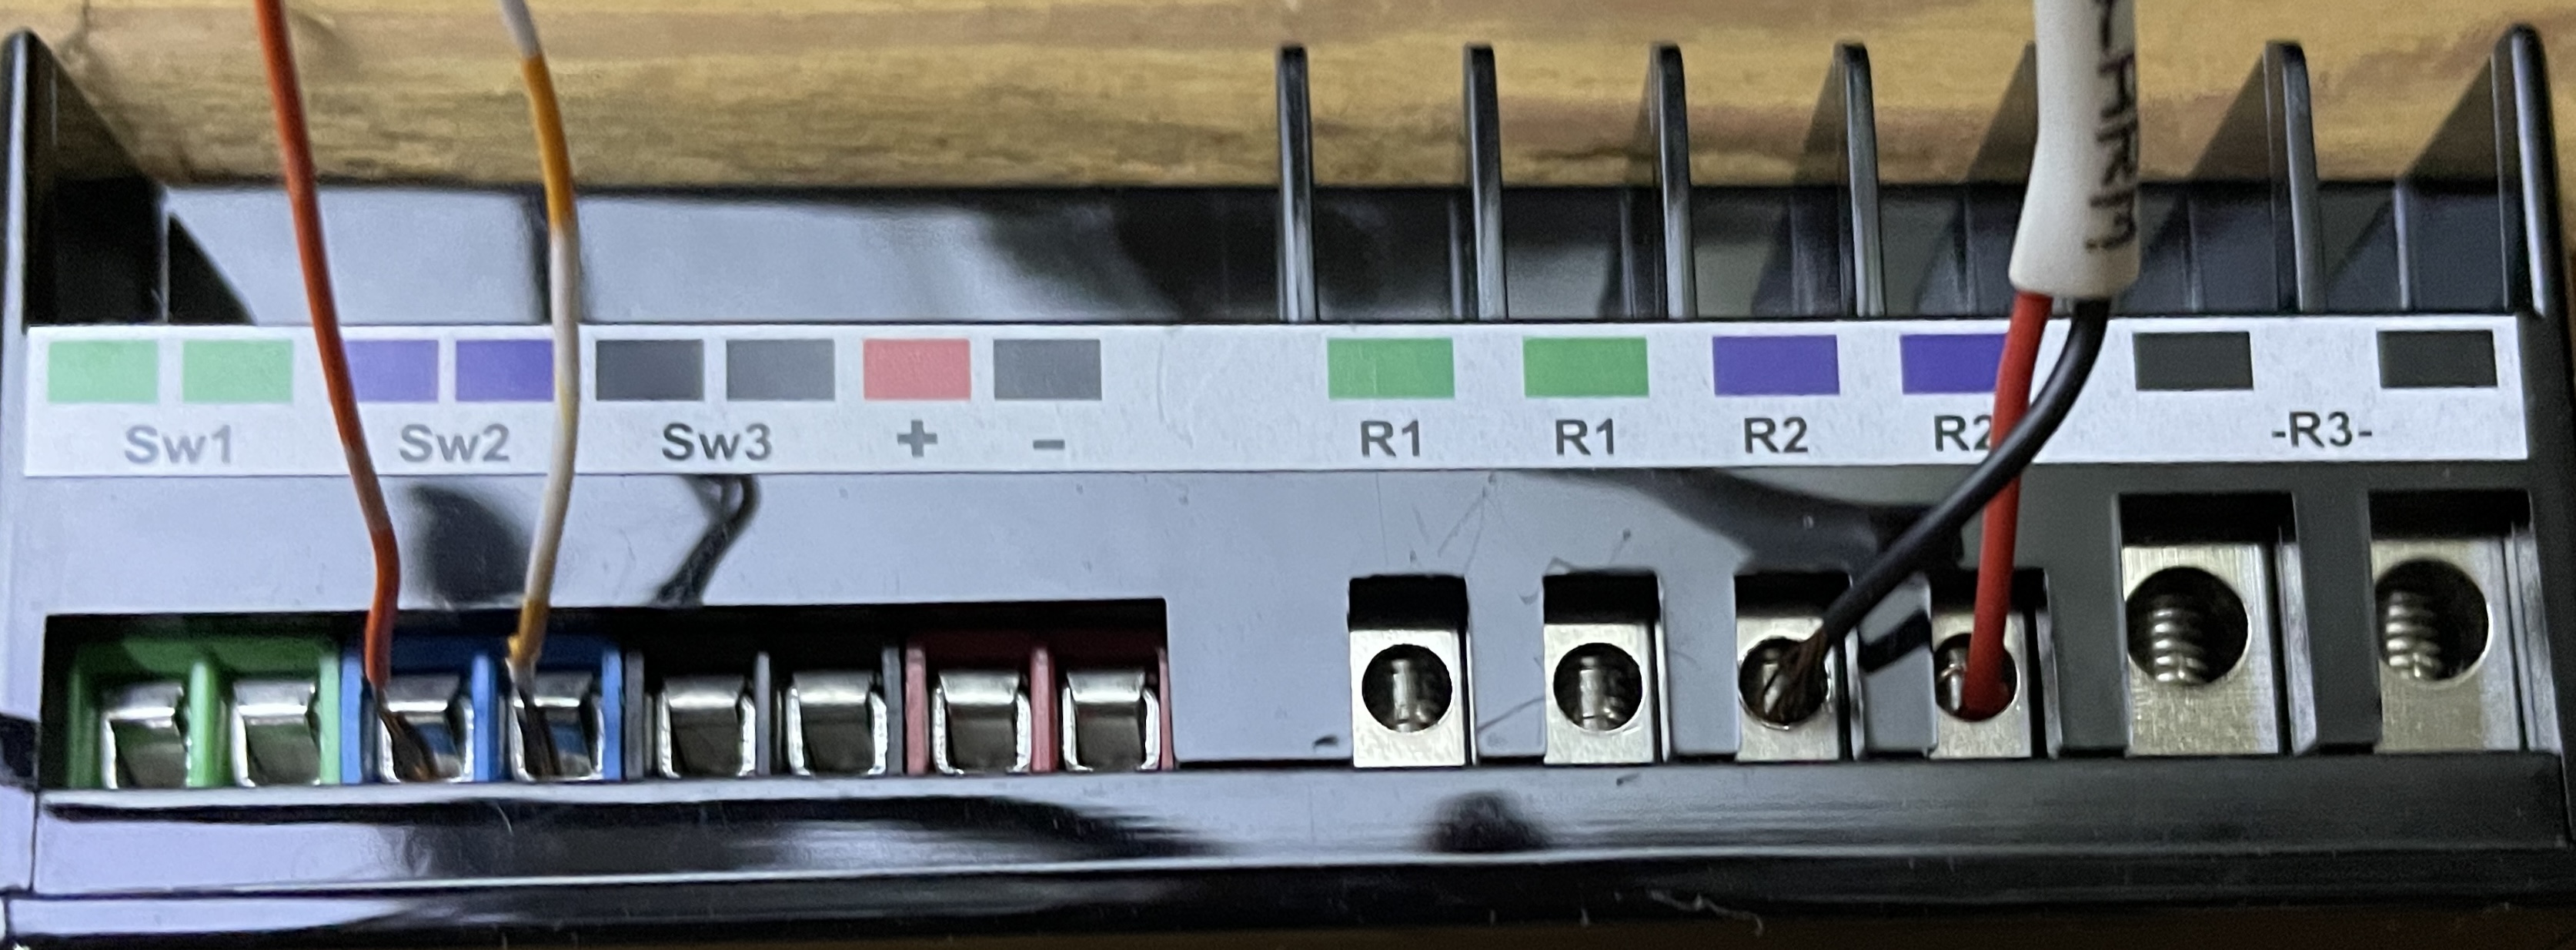
ZEN16 Relay
ZEN16 will monitor its switch Sw2 below, if is closed, then turn on relay R2, closing the circuit switch S1 above. Home Assistant will detect the change in relay R2 and issue notifications using its automation.yaml definition "alias: Garage Door Open".
ZEN16 will respond to relay R1 on/off commands from Home Assistant. The automation.yaml definition is called "alias: Bedroom Alarm" and turns on relay R1 at 6:00am. A Home Assistant dashboard button is enabled to turn relay R1 off.
Garage door connections:
| Purpose | Connection | HomeAssistant Entity_ID |
|---|---|---|
| Garage Door Switch | Sw2 | N/A |
| Wall-E Light Circuit | R2 | switch.garage_door_relay_zen16_2_2 |
| Alarm Light Radio | R1 | switch.garage_door_relay_zen16_2 |
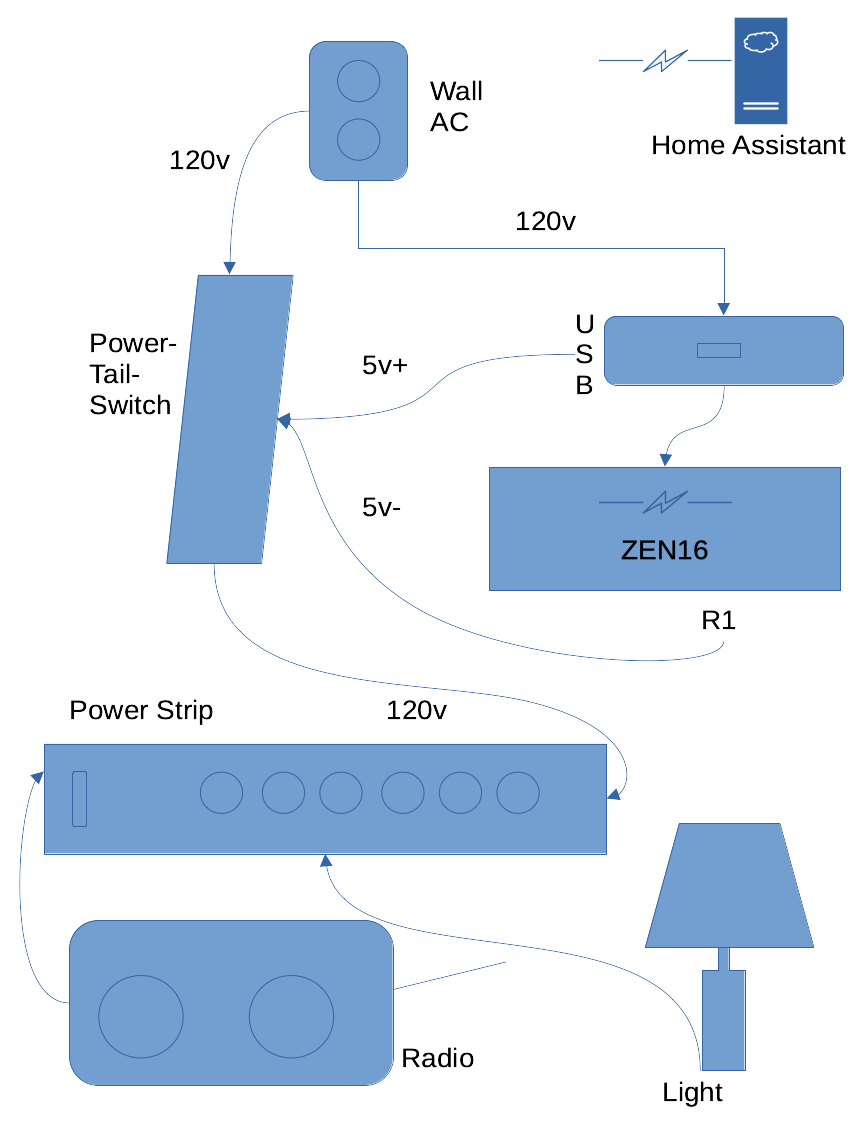
Alarm Light Radio - Diagram
The Power-Tail-Switch is a 120v AC relay controlled by 5v DC. The ZEN16 acts as a switch to turn relay R1 on and off. This opens/closes the 5v DC voltage flow to enable/disable the 102v AC voltage through the PowerSwitchTail, that sends power to the power strip turning on/off the radio and light plugged into it.
Z-Wave Devices
| Manufacturer | Product | Product Code | Name | Location |
|---|---|---|---|---|
| Silicon Labs | 700 Series-based Controller | ZST10-700 | Controller ZST10-700 | Basement |
| Ecolink | Z-Wave Door/Window Sensor | DWZWAVE25 | Basement Door DWZWAVE25 | Basement |
| Zooz | 4-in-1 Sensor | ZSE40 | Basement Motion ZSE40 | Basement |
| Zooz | Outdoor Motion Sensor | ZSE29 | Outside Motion ZSE29 | Deck |
| Zooz | Multirelay | ZEN16 | Garage Door Relay ZEN16 | Basement |
| Zooz | Double Plug | ZEN25 | Double Plug ZEN25 | Basement |
| Zooz | Z-Wave Plus On/Off Toggle Switch v4 | ZEN23 | Light Switch ZEN23 | Basement |
| Ecolink | Z-Wave Door/Window Sensor | DWZWAVE25 | Basement Window DWZWAVE25 | Basement |
| Ecolink | Z-Wave Door/Window Sensor | DWZWAVE25 | Sliding Door DWZWAVE25 | Living Room |
| Ecolink | Z-Wave Door/Window Sensor | DWZWAVE25 | Dining Room Window DWZWAVE25 | Dining Room |
| Ecolink | Z-Wave Door/Window Sensor | DWZWAVE25 | Front Door DWZWAVE25 | Front Door |
| Zooz | Double Plug | ZEN25 | Double Plug ZEN25 Bedroom | Bedroom |
| Honeywell | T6 Pro Z-Wave Programmable Thermostat | TH6320ZW | Thermostat - T5 | Living Room |
Purge
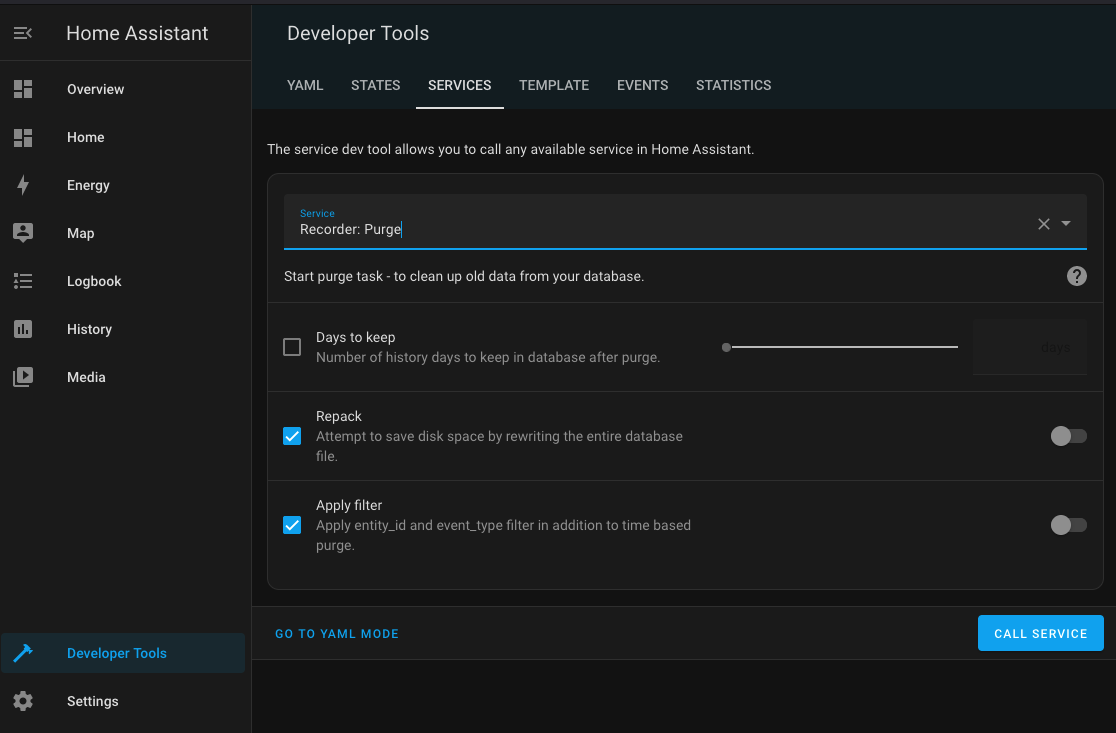
Continue
Now that you have set up Home Automation-Mail on your server, you will need Matrix for sending out alerts, so now is a good time to install the super fast and secure messaging system.
Proceed in the order presented, some things are depending on prior setups.
Book Last Updated: 29-March-2024
Home Automation - Linux in the House - https://linux-in-the-house.org
