BeagleBone
- SBC (Single/Small Board Computer)
- Serial Debug Connection
- Recover from lost root password
- Flash new Operating System
- Duplicate Micro-SD card
- Update Software
- Expand SD filesystem
- Disable cloud9 development platform
- bb-bbai-tether system
- BBAI-64 Switches
- BBAI-64 HDMI Display Connection
- BBAI-64 default memory device tree
- BBAI-64 Fix 'broken boot'
- BBAI-64 User LEDs
- BBAI Survival Guide
- Real Time Clock (RTC) system service and setup
- Music Player for the Car
- Power on/off another PC
- Reference
- Continue
SBC (Single/Small Board Computer)
The BeagleBone (BB) [1] line supports the Linux kernel and GPIO hardware connections to devices via device trees [2]. It is simular to the Rasberry-PI line, only BB is open source hardware.
They run a full featured Debian distribution, capable of running C, C++, Rust, Python and node-js, all the way up to a PostgreSQL database. It comes with a web-based IDE called Cloud-9 [3] that can also run node-js programs on the BB. The AI line also supplies image recognition packages.
You can connect a display, keyboard and mouse, or run it headless.
All have USB connectors to ssh into from a connected computer, most have wired Ethernet RJ-45 sockets, and some have Bluetooth and WiFi. Controlling relays, lights, I2C sensors, and open switches can be done in most any supported language, even bash.
For robotics, they feature a Programmable real-time unit and industrial communications subsystem (PRU-ICSS) [4].
The forum for questions is here: https://forum.beagleboard.org/
For example:
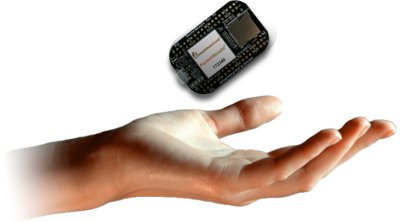
- PocketBeagle https://www.beagleboard.org/boards/pocketbeagle-original
- This runs:
- Rebuilt Garfield clock with seven-segment-display and alarm, keeping track of daylight saving time changes.
- Music box player.
- This runs:
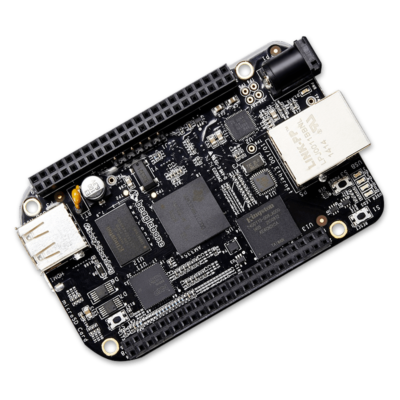
- BBB (Black) https://www.beagleboard.org/boards/beaglebone-black
- This runs very capabily:
- Music Player Daemon (MDP) [5]. You can control what is played on the command line or through a Phone App.
- Control lights and relays. You can use the Python based Flask [6] package to create nice looking web apps for this.
- This runs very capabily:
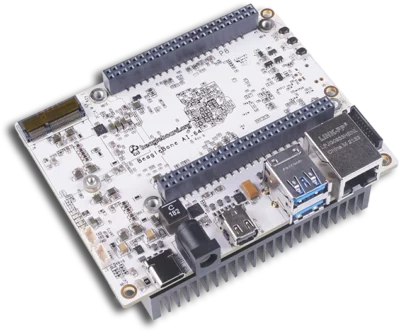
- BBAI (AI 32-bit, arm71) https://www.beagleboard.org/boards/beaglebone-ai
- Applications I used with this include:
- NextCloud server (little slow).
- Mini-Network Access Storage (NAS) with mirrored SSDs (mdadm).
- HomeAssistant home automation (without cameras).
- Applications I used with this include:
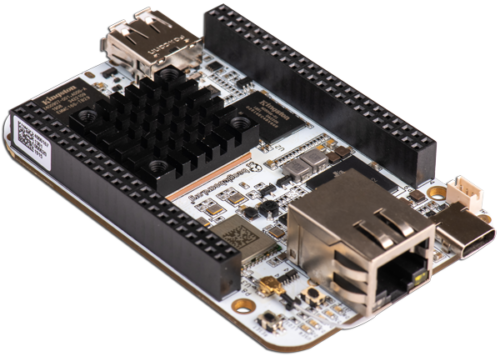
- BBAI-64 (AI 64-bit; arm64) https://www.beagleboard.org/boards/beaglebone-ai-64
- Very good at:
- NextCloud server (runs good).
- News Reader (MiniFlux).
- Small web site.
- Very good at:
- BeaglePlay is the latest offering (https://www.beagleboard.org/boards/beagleplay)
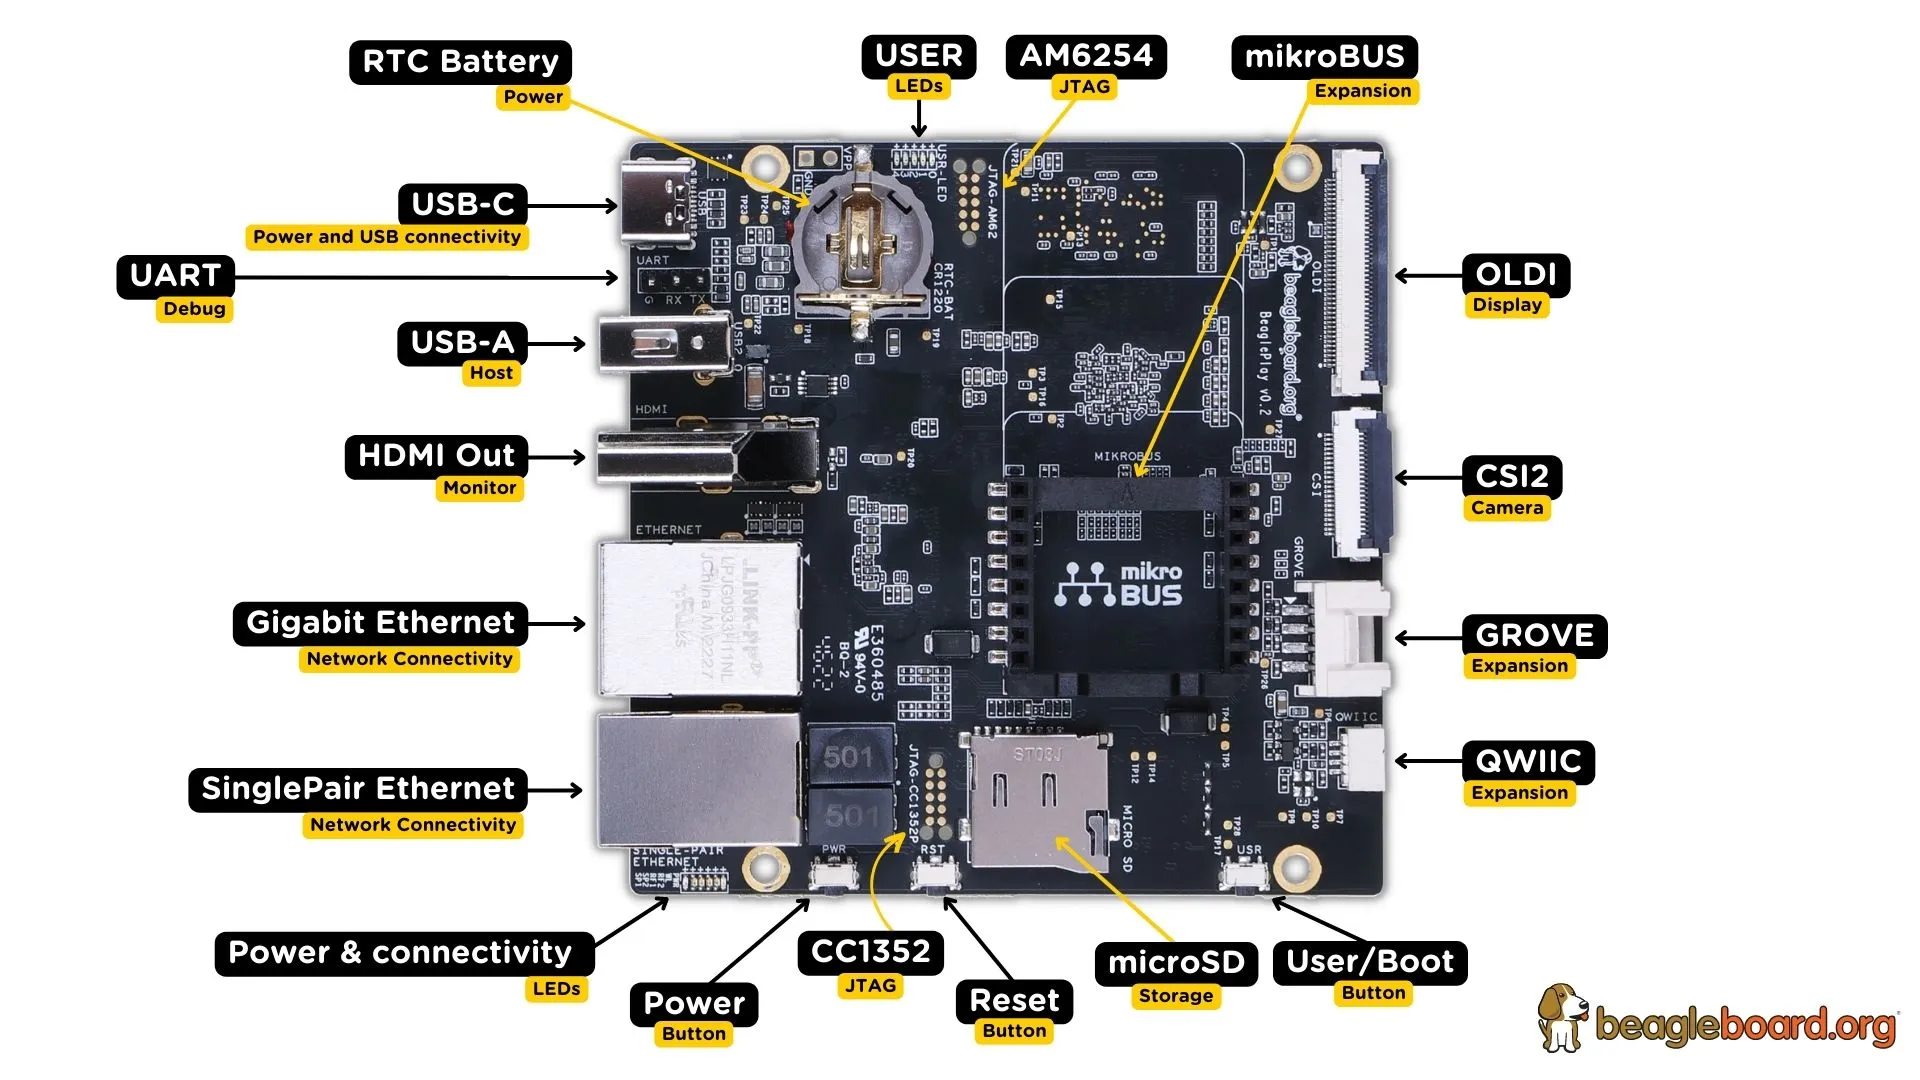
- Quad Arm® Cortex®-A53 microprocessor subsystem @ 1.4GHz
- Arm® Cortex®-M4F @ 400MHz
- Dual-core PRU subsystem @ 333MHz
- PowerVR® Rogue™ GPU
Features
- Small 8cm x 8cm form-factor
- 2GB RAM and 16GB on-board eMMC flash with high-speed interface
- USB type-C for power and data and USB type-A host
- Gigabit Ethernet, Single-pair Ethernet with PoDL
- Integrated 2.4GHz and 5GHz WiFi
- 2.4GHz and Sub-GHz programmable wireless MCU, integrated IEEE802.15.4 drivers/firmware
- Full-size HDMI, OLDI, 4-lane CSI
- Expansion via mikroBUS, Grove, QWIIC
- Zero-download out-of-box software experience with Debian GNU/Linux
- https://www.beagleboard.org/
- https://www.beagleboard.org/blog/2022-03-31-device-tree-supporting-similar-boards-the-beaglebone-example
- https://github.com/c9
- https://beagleboard.org/pru
- https://www.musicpd.org/
- https://flask.palletsprojects.com/en/2.2.x/
Serial Debug Connection
You can get through severe boot errors where the network is not connecting or disk partition not mounted, using a USB to TTL-232 cable [1], also called FTDI. This will show all the boot messages and allow login, even recovery if the kernel will not boot.
Make sure it is 3.3 volt! Connect the black wire to pin 1, orange/green to pin 4, yellow/white to pin5 directly on the SBC board.
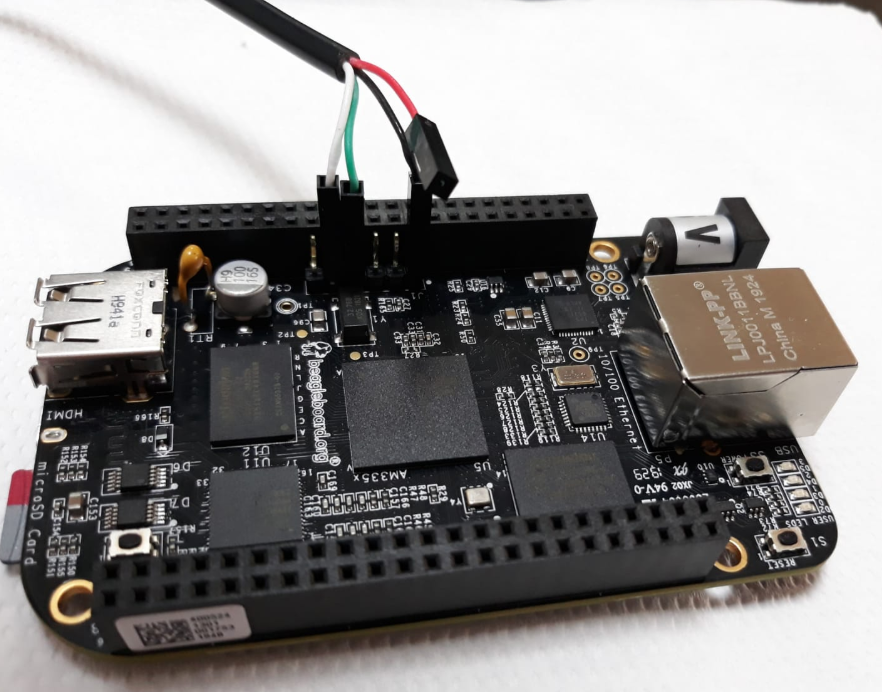
- USB to TTL cable

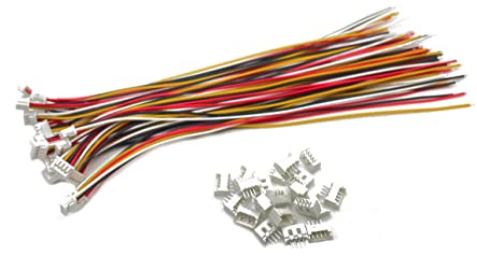
BBAI-64 Adapter
The BBAI-64 has a 3-pin connector so it needs an adapter; Micro JST MX 1.25 4Pins Connector Plug Socket 1.25mm Pitch Female Connector PCB Socket 150mm Cable. The red wire is not used. Plug the other three wires into the USB/TTL adapter above, matching colors.
Screen on Linux
When you have connected USB-end of the serial cable to a Linux based system like Ubuntu, a new tty* device appears in the system. Note down its name. In my case, it was /dev/ttyUSB0. Open a term and issue below command
$ sudo screen /dev/ttyUSB0 115200
Do ls /dev/ before and after connecting cable to find the new device name
You may have to reboot the PC and BB after connection to clear garbled characters.
Recover from lost root password
Flash a new mini-sd card and boot off of it, then:
- Mount the eMMC flash: mount /dev/mmcblk1p2 /media/card
- Change the root of the file system to be the partition on the eMMC flash which you just mounted: chroot /media/card
- Change the password of the root user to something you know: passwd root
- Exit out of the changed root: exit
- Shutdown the BeagleBone Black : shutdown -h now
- Disconnect the power from the board
- Eject the microSD card.
- Reconnect the power to the board
- Watch the board boot up, and log in as root. You should be able to log in with the password that you just set.
Flash new Operating System
Latest software: https://www.beagleboard.org/distros
Flashing refers to the process of transferring the Operating System image from a Micro-SD card to the on-board mmc memory disk.
WARNING: It will overlay the contents of your BBB soldered in mmc memory.
Be aware that the on-board mmc is only 15GB, so flashing an SD card with a partition larger than 15GB will fail with out of space.
Boot Order
The BB-AI 32-bit has a different disk device naming convention than 64-bit ;-)
BBAI-32 /dev/mmcblk0p1 = Micro-SD; /dev/mmcblk1p1 = On-board mmc
$ sudo inxi -D
Drives:    Local Storage: total: 1005.80 GiB used: 338.77 GiB (33.7%)
           ID-1: /dev/mmcblk0 model: BC1S5 size: 59.69 GiB
           ID-2: /dev/mmcblk1 model: TB2916 size: 14.60 GiB
...
See how cleverly the number 0 uses the natural Linux boot ordering.
BBAI-64 /dev/mmcblk1p1 = Micro-SD; /dev/mmcblk0p1 = On-board mmc
$ sudo inxi -D
Drives:    Local Storage: total: raw: 1.92 TiB usable: 1.01 TiB used: 156.93 GiB (15.2%)
           ID-1: /dev/mmcblk0 vendor: Kingston model: TB2916 size: 14.6 GiB
           ID-2: /dev/mmcblk1 model: BC1S5 size: 59.69 GiB
...
BB-AI 64-bit uses a new approach, extlinux.conf [1], that will probably be the standard going forward [2].
Here it is set to boot from mmcblk1p2.
File: /boot/firmware/extlinux/extlinux.conf
label Linux microSD
    kernel /Image
    fdt /k3-j721e-beagleboneai64-no-shared-mem.dtb
    append console=ttyS2,115200n8 earlycon=ns16550a,mmio32,0x02800000 root=/dev/mmcblk1p2 ro rootfstype=ext4 rootwait net.ifnames=0
    fdtdir /
    initrd /initrd.img
On the BBAI-64, by default we are using U-Boot’s now (finally) standard extlinux.conf, you’ll find it in the first fat partition of either the eMMC or microSD… (I have a long term goal to convert our custom “am335x/am57xx” uEnv.txt solution to extlinux.conf…) [2]
Reference:
- https://wiki.syslinux.org/wiki/index.php?title=EXTLINUX
- https://forum.beagleboard.org/t/bbai-64-boot-order/33129
Enable Flashing
BBAI-32: Flash
-
For example, download and burn a Micro-SD card, BBAI (32-bit) flasher: https://www.beagleboard.org/distros
-
Burn the download file to a Micro-SD, normally using Etcher https://etcher.balena.io
-
Turn off the BBB, insert the SD card and apply power.
-
This will copy the boot files on top of the mmc on-board disk,
-
If you start with the non-flasher and verify that it will boot, THEN edit the
/boot/uEnv.txt
file to activate (un-comment) the flasher script (last line in the file) and reboot the device to flash it.
File: /boot/uEnv.txt
##enable Generic eMMC Flasher:
cmdline=init=/usr/sbin/init-beagle-flasher
BBAI-64: Flash
* To flash a microSD to eMMC:
Run:
sudo apt update ; sudo apt upgrade
sudo beagle-flasher
Or to create a dedicated flasher:
sudo apt update ; sudo apt upgrade
sudo enable-beagle-flasher
sudo reboot
Reference: https://forum.beagleboard.org/t/ai-64-how-to-flash-emmc/32384/2
Flashing Process
You will see the lights doing a bouncing flash; 1,2,3,4 - 4,3,2,1 - etc… for several minutes, eventually it will turn itself off. Then pop out the SD card and re-apply power to boot up the newly flashed on-board mmc.
Disable Flashing
After booting the newly flashed on-board mmc;
BB-AI 32-Bit
- mount the SD card:
sudo mount /dev/mmcblk0p1 /media/card
- Comment out the ‘flashing’ line in uEnv.txt like this:
$ tail /media/card/boot/uEnv.txt
...
##enable Generic eMMC Flasher:
#cmdline=init=/usr/sbin/init-beagle-flasher
- It is now safe to boot off the SD card! Push it back in and it will be selected during the boot process, before the mmc.
I usually boot onto the Micro-SD and run that way. If it fails you can always remove it and still have a bootable environment.
BB-AI 64-Bit
Disable a dedicated flasher, download the latest non-flasher and re-burn the Micro-SD card.
To Check, mount it on a PC and look at directory :
File: <mount point>/boot/firmware/extlinux/extlinux.conf
...
    append console=ttyS2,115200n8 earlycon=ns16550a,mmio32,0x02800000 root=/dev/mmcblk1p2 ro rootfstype=ext4 rootwait net.ifnames=0
...
Above shows a normal boot file. A flasher will point to a beagle-flasher image to boot onto.
Duplicate Micro-SD card
It is a good idea to backup the active Micro0SD card after all your hard work. Re-imaging and installing all the packages is a pain!
This process will copy everything on the SD card, even blank data. So a 64GB card will make a 64GB img file. Your destination card must be at least as big as the original.
Insert the original SD card and check the name of the device (usually mmcblkX or sdcX):
$ sudo lsblkid -a
...
mmcblk0     179:0    0  59.7G  0 disk
├─mmcblk0p1 179:1    0   128M  0 part  /media/don/BOOT
└─mmcblk0p2 179:2    0  59.6G  0 part  /media/don/rootfs
$ sudo fdisk -l
...
Device         Boot   Start      End  Sectors  Size Id Type
/dev/mmcblk0p1 *       2048  2099199  2097152    1G  c W95 FAT32 (LBA)
/dev/mmcblk0p2      2099200 31116287 29017088 13.9G 83 Linux
In my case the SD card is /dev/mmcblk0 (the *p1 and *p2 are the partitions).
You have to unmount the devices:
$ sudo umount /dev/mmcblk0p1
$ sudo umount /dev/mmcblk0p2
To create an image of the device:
$ sudo dd if=/dev/mmcblk0 of=~/sd-card-copy.img bs=4M status=progress
This will take a while.
Once it's finished, insert the empty SD card. If the device is different (USB or other type of SD card reader) verify its name and be sure to unmount it:
$ sudo fdisk -l
$ sudo umount /dev/mmcblk0p1
$ sudo umount /dev/mmcblk0p2
Write the image to the device:
$ sudo dd if=~/sd-card-copy.img of=/dev/mmcblk0 bs=4M status=progress
The write operation is much slower than before.
Update Software
Update examples in the Cloud9 IDE workspace
cd /var/lib/cloud9
git pull
...
Update the boot-up scripts and Linux kernel
cd /opt/scripts
git pull
Update Kernel
cd /opt/scripts
sudo tools/update_kernel.sh
Expand SD filesystem
Sometimes when you burn an .iso image to the SD card and boot up the BB, the filesystem will be 4GB while your SD card could be 32GB.
This script will expand the filesystem after your first boot up onto it.
$ sudo /opt/scripts/tools/grow_partition.sh
- If the script is not available, use this:
Examine the partitioning on your external SD card:
$ sudo fdisk /dev/mmcblk0
Then enter 'p', An important value to note is the start sector of the Linux partition, enter 'd' to delete the Linux partition. (If you have two partitions it will ask which partition to delete, which should be 2.).
Enter 'n' to create a new partition. For the first two questions (partition type and number) just press enter. For the start sector, be absolutely sure to use the same number it had originally. For the last sector, you can use whatever you want in case you don't want to use your whole micro SD, but you can just hit enter to use the default (the max size possible).
If you are satisfied with your changes at this point you can enter 'w' to commit to your changes.
A warning above will appear if you're repartitioning the disk you've booted from. In that case, reboot your system
Lastly, after your BeagleBone Black reboots, you need to expand the file system. Before expanding you need to run fsck as root, otherwise next command will fail to run:
$ sudo fsck /dev/mmcblk0p1
Finally, run the following command (again as root):
$ sudo resize2fs /dev/mmcblk0p1
Once this command completes, you're done!
Reference:
-
https://github.com/RobertCNelson/boot-scripts/blob/master/tools/grow_partition.sh
-
https://elinux.org/Beagleboard:Expanding_File_System_Partition_On_A_microSD
Disable cloud9 development platform
This allows over the web programming on the system, which is a security risk if not being used.
Disable:
systemctl disable cloud9.service
systemctl disable bonescript.service
systemctl disable bonescript.socket
systemctl disable bonescript-autorun.service
Example of service file
debian@pocketbeagle:~$ cat /lib/systemd/system/cloud9.service
[Unit]
Description=Cloud9 IDE
ConditionPathExists=|/var/lib/cloud9

[Service]
WorkingDirectory=/opt/cloud9/build/standalonebuild
EnvironmentFile=/etc/default/cloud9
ExecStartPre=/opt/cloud9/cloud9-symlink
ExecStart=/usr/bin/nodejs server.js --packed -w /var/lib/cloud9 SyslogIdentifier=cloud9ide
User=1000
bb-bbai-tether system
This is used to connect your device/PC to => BB-AI and BBB over WiFi.
BBAI-64 uses systemd-networkd [1] (files: /etc/systemd/network/*)
Config file: /etc/default/bb-wl18xx
# TETHER_ENABLED: Whether or not to run the /usr/bin/bb-wl18xx-tether daemon; set to no to disable.
#TETHER_ENABLED=yes
TETHER_ENABLED=no

# USE_CONNMAN_TETHER: Whether or not to just use connman tether inteface; set to no to disable.
USE_CONNMAN_TETHER=no

# USE_WL18XX_IP_PREFIX: default IP block of SoftAP0 interface
USE_WL18XX_IP_PREFIX="192.168.18"

# USE_INTERNAL_WL18XX_MAC_ADDRESS: use internal mac address; set to no to disable.
USE_INTERNAL_WL18XX_MAC_ADDRESS=yes

# USE_WL18XX_MAC_ADDRESS: use custom mac address, for when work wifi starts sending deauthentication packet spam.
#USE_WL18XX_MAC_ADDRESS="AB:10:23:C:16:78"

# USE_WL18XX_POWER_MANAGMENT: (sudo iwconfig wlan0 power [on/off]). on = boot default, off is more reliable for accessing idle systems over time
USE_WL18XX_POWER_MANAGMENT=off

# USE_PERSONAL_SSID: set custom ssid
#USE_PERSONAL_SSID="BeagleBone"
USE_PERSONAL_SSID="AB10"

# USE_PERSONAL_PASSWORD: set ssid password
USE_PERSONAL_PASSWORD="BeagleBone"

# USE_GENERATED_DNSMASQ: use generated version of /etc/dnsmasq.d/SoftAp0; set to no so user can modify /etc/dnsmasq.d/SoftAp0
USE_GENERATED_DNSMASQ=yes

# USE_GENERATED_HOSTAPD: use generated version of /etc/hostapd.conf; set to no so user can modify /etc/hostapd.conf
USE_GENERATED_HOSTAPD=yes

# USE_APPENDED_SSID: appends mac address after SSID (aka -WXYZ, BeagleBone-WXYZ)
USE_APPENDED_SSID=yes

# USE_PERSONAL_COUNTRY: (default is US, but note enabled (#) with comment)
#USE_PERSONAL_COUNTRY=US
Service:
$ sudo systemctl status bb-bbai-tether
● bb-bbai-tether.service - BBAI brcmfmac tether Service
    Loaded: loaded (/lib/systemd/system/bb-bbai-tether.service; enabled; vendor preset: enabled)
    Active: activating (start) since Sun 2022-09-04 12:19:48 EDT; 16s ago
Cntrl PID: 2585 (bb-bbai-tether)
     Tasks: 2 (limit: 937)
    Memory: 752.0K
    CGroup: /system.slice/bb-bbai-tether.service
            ├─2585 /bin/bash -e /usr/bin/bb-bbai-tether
            └─2605 sleep 5 Sep 04 12:19:48 bbb.example.com systemd[1]: Starting BBAI brcmfmac tether Service...
Sep 04 12:19:53 bbb.example.com bb-bbai-tether[2585]: bbai:tether waiting for /sys/class/net/wlan0
Sep 04 12:19:58 bbb.example.com bb-bbai-tether[2585]: bbai:tether waiting for /sys/class/net/wlan0
Sep 04 12:20:03 bbb.example.com bb-bbai-tether[2585]: bbai:tether waiting for /sys/class/net/wlan0
don@app:~$ sudo systemctl stop bb-bbai-tether
BBAI-64 Switches
Push-buttons used on the board.
- A switch is provided to allow switching between the modes.
-
Holding the boot switch down during a removal and reapplication of power without a microSD card inserted will force the boot source to be the USB port and if nothing is detected on the USB client port, it will go to the serial port for download.
-
Without holding the switch, the board will boot try to boot from the eMMC. If it is empty, then it will try booting from the microSD slot, followed by the serial port, and then the USB port.
-
If you hold the boot switch down during the removal and reapplication of power to the board, and you have a microSD card inserted with a bootable image, the board will boot from the microSD card.
NOTE: Pressing the RESET button on the board will NOT result in a change of the boot mode. You MUST remove power and reapply power to change the boot mode. The boot pins are sampled during power on reset from the PMIC to the processor. The reset button on the board is a warm reset only and will not force a boot mode change.
-
BBAI-64 HDMI Display Connection
When connecting to an HDMI monitor, make sure your miniDP adapter is active. A passive adapter will not work. See Fig: Display adaptors.
BBAI-64 default memory device tree
Reference: https://forum.beagleboard.org/t/beaglebone-ai-64-memory-4gb-or-2gb-ram/32270
the AI-64 has 4GB installed, the other 2GB is reserved in the default image thru remoteproc for the other companion cores (c6, c7x, and R5)…
We have a custom device tree for you if you’d like to disable the other cores and use all 4GB with the A72’s…
=> No Shared Memory => k3-j721e-beagleboneai64-no-shared-mem.dtb

debian@BeagleBone:~$ sudo find /boot/ -name extlinux.conf
/boot/firmware/extlinux/extlinux.conf

debian@BeagleBone:~$ sudo ls /boot/firmware
extlinux  Image       k3-j721e-beagleboneai64.dtb         k3-j721e-common-proc-board.dtb    k3-j721e-sk.dtb  sysfw.itb     tispl.bin
ID.txt      initrd.img  k3-j721e-beagleboneai64-no-shared-mem.dtb  k3-j721e-proc-board-tps65917.dtb  overlays        tiboot3.bin  u-boot.img

..
so in /boot/firmware/extlinux/extlinux.conf just set:
fdt /k3-j721e-beagleboneai64-no-shared-mem.dtb
take it out to go back to sharing memory for PRU.
$ cat /boot/firmware/extlinux/extlinux.conf
label Linux microSD
    kernel /Image
    fdt /k3-j721e-beagleboneai64-no-shared-mem.dtb
    append console=ttyS2,115200n8 earlycon=ns16550a,mmio32,0x02800000 root=/dev/mmcblk1p2 ro rootfstype=ext4 rootwait net.ifnames=0
    fdtdir /
    initrd /initrd.img
BBAI-64 Fix 'broken boot'
Finger on both boot and reset:
Insert power
lift finger on reset
wait till led lights
lift finger on boot.
Since you have the serial boot log, stop u-boot with the “space” key…
# run emmc_erase_boot0
=> Reboot with SD card inserted, newly burned image: bbai64-debian-11.3-xfce-arm64-2022-06-14-10gb.img.xz
$ sudo apt update

$ sudo apt upgrade

debian@BeagleBone:~$ sudo /opt/u-boot/bb-u-boot-beagleboneai64/install-emmc.sh
Changing ext_csd[BOOT_BUS_CONDITIONS] from 0x02 to 0x02
H/W Reset is already permanently enabled on /dev/mmcblk0
Clearing eMMC boot0
dd if=/dev/zero of=/dev/mmcblk0boot0 count=32 bs=128k
32+0 records in
32+0 records out
4194304 bytes (4.2 MB, 4.0 MiB) copied, 0.549462 s, 7.6 MB/s
dd if=/opt/u-boot/bb-u-boot-beagleboneai64/tiboot3.bin of=/dev/mmcblk0boot0 bs=128k
2+1 records in
2+1 records out
283940 bytes (284 kB, 277 KiB) copied, 1.13585 s, 250 kB/s
debian@BeagleBone:~$ sudo /opt/u-boot/bb-u-boot-beagleboneai64/install-microsd.sh
'/opt/u-boot/bb-k3-image-gen-j721e-evm/sysfw.itb' -> '/boot/firmware/sysfw.itb'
'/opt/u-boot/bb-u-boot-beagleboneai64/tiboot3.bin' -> '/boot/firmware/tiboot3.bin'
'/opt/u-boot/bb-u-boot-beagleboneai64/tispl.bin' -> '/boot/firmware/tispl.bin'
'/opt/u-boot/bb-u-boot-beagleboneai64/u-boot.img' -> '/boot/firmware/u-boot.img'

$ sudo reboot
=> Login
$ uname -a

Linux BeagleBone 5.10.120-ti-arm64-r50 #1bullseye SMP PREEMPT Tue Jun 28 20:37:27 UTC 2022 aarch64 GNU/Linux

$ df -h
Filesystem      Size  Used Avail Use% Mounted on
udev            1.8G     0  1.8G   0% /dev
tmpfs           371M  2.0M  369M   1% /run
/dev/mmcblk1p2   59G  9.7G   47G  18% /
tmpfs           1.9G   16K  1.9G   1% /dev/shm
tmpfs           5.0M  4.0K  5.0M   1% /run/lock
/dev/mmcblk1p1  127M   47M   80M  38% /boot/firmware
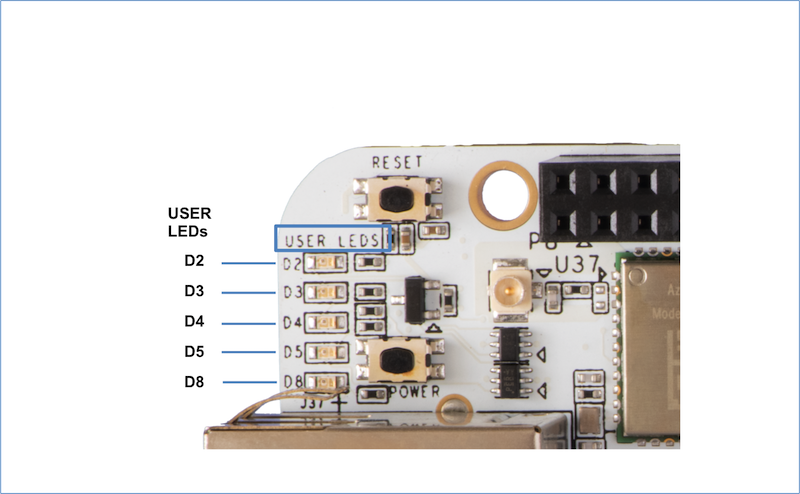
BBAI-64 User LEDs
| LED | GPIO Signal | Default Function |
|---|---|---|
| D2 | GPIO3_17 | Heartbeat when Linux is running |
| D3 | GPIO5_5 | microSD Activity |
| D4 | GPIO3_15 | CPU Activity |
| D5 | GPIO3_14 | eMMC Activity |
| D8 | GPIO3_7 | WiFi/Bluetooth Activity |
BBAI Survival Guide
Real Time Clock (RTC) system service and setup
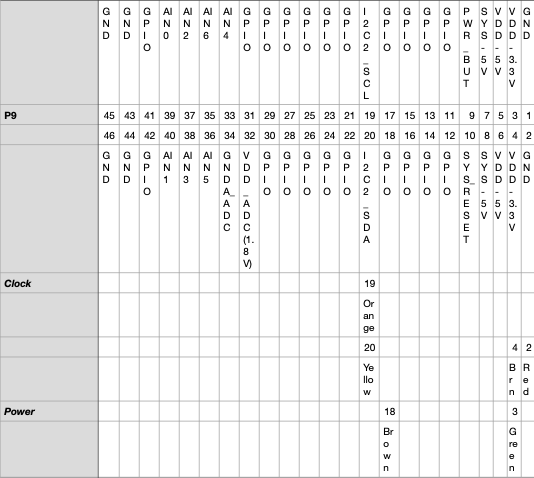
Any clock needs to keep it's time when the power goes out. Since the PocketBeagle is not always connected to WiFi to sync with Network Time Services, we will install a Real Time Clock with a small battery [1].
Real Time Clock setup using i2c, ExploringBB: pp350 [1]
Here is the wiring diagram for a PocketBeagle:
- PocketBeagle <-> DS3231 RTC
- I2C1:
- Pin 14 - VCC
- Pin 16 - GND
- Pin 9 - SCL
- Pin 11 - SDA
Setup proedure:
$ sudo apt install i2c-tools
$ i2cdetect
$ i2cdump -y 1 0x68 b
$ hwclock -r -f /dev/rtc1
# (Note: rtc0 is active on-board)

$ sudo modprobe rtc-ds1307
$ sudo /bin/sh -c "/bin/echo ds1307 0x68 > /sys/class/i2c-adapter/i2c-1/new_device"
#  Now /dev/rtc1 should show up, echo delete_device to remove it.

# hwclock -r (read)
# hwclock -w (write)
# hwclock -s (set RTC to system time)
$ hwclock --set --date "2019-01-01 00:00:00"
# (set new time)

$ sudo systemctl enable hwclock.service
$ sudo systemctl status hwclock.service
$ reboot
Service File
File: /etc/systemd/system/clock.service
[Unit]

Description=RTC Service
Before=getty.target

[Service]
Type=oneshot
ExecStartPre=/bin/sh -c "/bin/echo ds1307 0x68 > /sys/class/i2c-adapter/i2c-1/new_device"
ExecStart=/sbin/hwclock -s -f /dev/rtc1
RemainAfterExit=yes

[Install]
WantedBy=multi-user.target
Seven Segment Display
Now we can install a Seven Segment Display [1] to show the time. I used an old Garfield clock with sentimental memories, and brought it back to life.
NOTE: If running python3, substitute python for python3 below.
$ sudo apt-get update
$ sudo apt-get install build-essential python-pip python-dev python-smbus git

$ git clone https://github.com/adafruit/Adafruit_Python_GPIO.git
$ cd Adafruit_Python_GPIO
$ sudo python setup.py install

$ git clone https://github.com/adafruit/Adafruit_Python_LED_Backpack.git

$ cd Adafruit_Python_LED_Backpack
$ sudo python setup.py install

$ git clone https://github.com/adafruit/Adafruit-GFX-Library.git

$ cd Adafruit_GFX
$ sudo python setup.py install
Adafruit Python LED Backpack

Python library for controlling LED backpack displays such as 8x8 matrices, bar graphs, and 7/14-segment displays on a Raspberry Pi or BeagleBone Black.

Designed specifically to work with the Adafruit LED backpack displays ----> https://learn.adafruit.com/adafruit-led-backpack/overview

For all platforms (Raspberry Pi and Beaglebone Black) make sure your system is able to compile Python extensions. On Raspbian or Beaglebone Black's Debian/Ubuntu image you can ensure your system is ready by executing:

$ sudo apt-get update
$ sudo apt-get install build-essential python-dev

You will also need to make sure the python-smbus and python-imaging library is installed by executing:

$ sudo apt-get install python-smbus python-imaging

Install the library by downloading with the download link on the right, unzipping the archive, navigating inside the library's directory and executing:

$ sudo python setup.py install

See example of usage in the examples folder.
Clock testing
$ sudo apt install python-pip
$ pip install adafruit_gpio

$ cd Adafruit_Python_LED_Backpack/examples

$ python sevensegment_test.py
Clock Code
File: clock.py
import time

from Adafruit_LED_Backpack import SevenSegment


# Create display instance on default I2C address (0x70) and bus number.
display = SevenSegment.SevenSegment()

# Alternatively, create a display with a specific I2C address and/or bus.
# display = SevenSegment.SevenSegment(address=0x74, busnum=1)

# On BeagleBone, try busnum=2 if IOError occurs with busnum=1
# display = SevenSegment.SevenSegment(address=0x74, busnum=2)

# Initialize the display. Must be called once before using the display.
display.begin()

# Keep track of the colon being turned on or off.
colon = True

import datetime
now = datetime.datetime.now()
print ("Current date and time : ")
print (now.strftime("%Y-%m-%d %H:%M:%S"))
#
OLD_MIN = "99"
while True:
  MIN = now.strftime("%M")
  if ( MIN != OLD_MIN ):
         OLD_MIN = now.strftime("%M")
         # Clear the display buffer.
         display.clear()
         # Print the time to the display.
         display.print_number_str(now.strftime("%l%M"))
         # PM flag, lower right dot
         display.set_decimal(3, 1)
         # ... set a segment of a digit ...
         #display.set_digit_raw(0, 1)
         # Set the colon on or off (True/False).
         display.set_colon(colon)
         # Write the display buffer to the hardware.  This must be called to
         # update the actual display LEDs.
         display.write_display()
         # Delay for a second.
     time.sleep(1.0)
     now = datetime.datetime.now()
     # Flip colon on or off.
     colon = not colon
     display.set_colon(colon)
     # Write the display buffer to the hardware.  This must be called to
     # update the actual display LEDs.
     display.write_display()
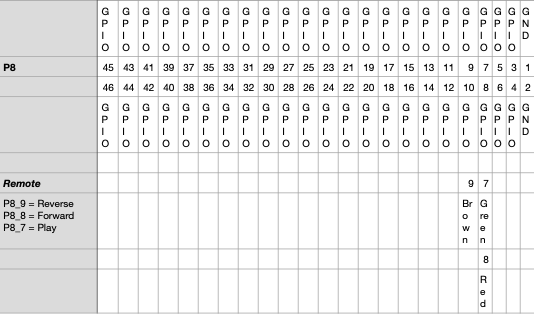
Music Player for the Car
This is a BBB under the seat with a wired mint box running Music Player Daemon [1].
Installed three buttons
-
Back - run
mpc prev -
Play/Stop - run
mpc pause/play -
Forward - run
mpc next
Wiring Pins
Service
File: /etc/systemd/system/remote.service
[Unit]
Description=Remote Control Music Player
After=network.target
StartLimitIntervalSec=0

[Service]
Type=simple
Restart=always
RestartSec=1
User=root
ExecStop=/data/home/remote/remote_stop.sh
ExecStart=/data/home/remote/remote.sh

[Install]
WantedBy=multi-user.target
Forward
File: forward.js
/**********************************************************************
 File: forward.js
 Usage: Wire 3.3v (P9_3) and GPIO (P8_8, P8_7, P8_9) to switches
 Service: remote.service
 Author: Don Cohoon
 History
 16-Oct-2019   Created
**********************************************************************/
var b = require('bonescript');
const { exec } = require('child_process');
// GPIO inputs
const FORWARD = 'P8_8';
const PLAY    = 'P8_7'; // Also STOP
const REVERSE = 'P8_9';
// Is button pressed or released?
const RELEASE = 0;
const PRESS   = 1;
//
b.pinMode(FORWARD, b.INPUT);
b.pinMode(PLAY,    b.INPUT);
b.pinMode(REVERSE, b.INPUT);
setInterval(check,1000);
//
// ---------------------------
function check(){
	b.digitalRead(FORWARD, checkForward);
}

// ---------------------------
function checkForward(err, response){
	if (response == 1){
		console.log('Forward pushed');
		exec('/usr/bin/mpc next', ( err, stdout, stderr) => {
			if (err) {
				console.log(stderr);
				return;
			}
		});
	} else {
	null; //	console.log('Button NOT pushed');
	}

}
Play
File: play.js
/**********************************************************************
 File: play.js
 Usage: Wire 3.3v (P9_3) and GPIO (P8_8, P8_7, P8_9) to switches
 Service: remote.service
 Author: Don Cohoon
 History
 16-Oct-2019   Created
**********************************************************************/
var b = require('bonescript');
const { exec } = require('child_process');
// GPIO inputs
const FORWARD = 'P8_8';
const PLAY    = 'P8_7'; // Also STOP
const REVERSE = 'P8_9';
// Is button pressed or released?
const RELEASE = 0;
const PRESS   = 1;
//
b.pinMode(FORWARD, b.INPUT);
b.pinMode(PLAY,    b.INPUT);
b.pinMode(REVERSE, b.INPUT);
setInterval(check,1000);
//
// ---------------------------
function check(){
	b.digitalRead(PLAY, checkPlay);
}

// ---------------------------
function checkPlay(err, response){
	if (response == 1){
		console.log('Play pushed');
		exec('/usr/bin/mpc current', ( err, stdout, stderr) => {
			if (err) {
				console.log(stderr);
				return;
			}
			if (stdout) {
				console.log('Stop playing ',stdout);
				exec('/usr/bin/mpc stop', ( err, stdout, stderr) => {
					if (err) {
						console.log(stderr);
						return;
					}
				});
				return;
			} else {
				console.log('Play resumed');
				exec('/usr/bin/mpc play', ( err, stdout, stderr) => {
					if (err) {
						console.log(stderr);
						return;
					}
				});
				return;
			}

		}); // current
	} else {
	null; //	console.log('Button NOT pushed');
	}

}
Remote
File: remote.sh
#!/bin/bash
export NODE_PATH=/usr/local/lib/node_modules/
export NODE_MODULES_CONTEXT=1
PIDFILE=/var/run/remote.pid
# node -pe "require('bonescript').getPlatform().bonescript"
#
function log() {
	echo "`date` $@ " >> /var/log/remote.log
}
#
procs=(
     '/data/home/remote/forward.js'
     '/data/home/remote/play.js '
     '/data/home/remote/reverse.js'
    )
n_procs=0
while [ "x${procs[n_procs]}" != "x" ]
do
	   n_procs=$(( $n_procs + 1 ))
done
inx=1
#
echo $$ > $PIDFILE
cd /data/home/remote
log "Starting $$"
while true
do
	# run processes and store pids in array
	for i in ${procs[@]}; do
	  echo "Starting /usr/bin/node ${i}"
	  /usr/bin/node ${i} &
	  pids[${inx}]=$!
	  let "inx = $inx + 1"
	done

	# wait for all pids
	echo ${pids[*]}
	for pid in ${pids[*]}; do
	      wait $pid
	    done
	sleep 30
	log "Restarting after error"
done
Remote Stop
File: remote_stop.sh
#!/bin/bash
TPID=$( /bin/cat /var/run/remote.pid )
/bin/kill -9 ${TPID}
/usr/bin/killall -e /usr/bin/node
Reverse
File: reverse.js
/**********************************************************************
 File: reverse.js
 Usage: Wire 3.3v (P9_3) and GPIO (P8_8, P8_7, P8_9) to switches
 Service: remote.service
 Author: Don Cohoon
 History
 16-Oct-2019   Created
**********************************************************************/
var b = require('bonescript');
const { exec } = require('child_process');
// GPIO inputs
const FORWARD = 'P8_8';
const PLAY    = 'P8_7'; // Also STOP
const REVERSE = 'P8_9';
// Is button pressed or released?
const RELEASE = 0;
const PRESS   = 1;
//
b.pinMode(FORWARD, b.INPUT);
b.pinMode(PLAY,    b.INPUT);
b.pinMode(REVERSE, b.INPUT);
setInterval(check,1000);
//
// ---------------------------
function check(){
	b.digitalRead(REVERSE, checkReverse);
}

// ---------------------------
function checkReverse(err, response){
	if (response == 1){
		console.log('Reverse pushed');
		exec('/usr/bin/mpc prev', ( err, stdout, stderr) => {
			if (err) {
				console.log(stderr);
				return;
			}
		});
	} else {
	null; //	console.log('Button NOT pushed');
	}

}
Power on/off another PC
This project uses a web application written in flask to power on or off two different PCs remotely, and also a PowerTail Switch.
-
Server one:
- Wire pins P8_11 in parallel to power button
- Wire pins P8_12 in parallel to reset button
-
Server two:
- Wire pins P8_13 in parallel to power button
- Wire pins P8_14 in parallel to reset button
-
PowerTail Light [1]
- Wire pins P9_21 to the PowerTail input control screws
File: boot.py
import time, datetime
from itertools import cycle
import os
from werkzeug.debug import DebuggedApplication

from flask import Flask, render_template, request, Response, session, redirect, url_for
from functools import wraps
import subprocess
import logging
logging.basicConfig(filename='boot.log',level=logging.DEBUG,
            format='%(asctime)s - %(name)s - %(levelname)s - %(message)s')

# Limit ddos
from werkzeug.wrappers import BaseRequest , BaseResponse
class Response ( BaseResponse):
    # limit 1m for input request and form response
    max_content_length = 1024 * 1024 * 1
    max_form_memory_size = 1024 * 1024 * 1

import Adafruit_BBIO.GPIO as GPIO
GPIO.setup("P9_21", GPIO.OUT)
GPIO.output("P9_21", GPIO.HIGH) # TimeLight off
GPIO.setup("P8_11", GPIO.OUT)
GPIO.output("P8_11", GPIO.HIGH)
GPIO.setup("P8_12", GPIO.OUT)
GPIO.output("P8_12", GPIO.HIGH)
GPIO.setup("P8_13", GPIO.OUT)
GPIO.output("P8_13", GPIO.HIGH)
GPIO.setup("P8_14", GPIO.OUT)
GPIO.output("P8_14", GPIO.HIGH)


ASSETS_DIR = os.path.dirname(os.path.abspath(__file__))
app = Flask(__name__)

#@app.before_request # to get your header token and check for its validity

#---------------------------------
# route for handling the login page logic
@app.route('/login', methods=['GET', 'POST'])
def login():
    error = None
    if request.method == 'POST':
        if request.form['username'] != 'SecretUser' or request.form['password'] != 'SecretPassword':
            error = 'Invalid Credentials. Please try again.'
            session['logged_in'] = False
        else:
            session['logged_in'] = True
            return redirect(url_for('secret_page'))

    return render_template('login.html', error=error)

#---------------------------------
# default page
@app.route("/")
@app.route("/index")
def hello():

    return render_template('index.html')

#---------------------------------
# control server boot actions
@app.route('/secret-page', methods=['GET','POST'])
def secret_page():
    msg='';
    if 'logged_in' in session:
      start_time = session.get('session_time', None)
      if start_time is None:
        start_time = datetime.datetime.now()
        session['session_time'] = start_time
      end_time = start_time + datetime.timedelta(minutes=5)
      if datetime.datetime.now() > end_time:
        session.clear()
        start_time = session.get('session_time', None)
        return redirect(url_for('login', next=request.url))
    else:
      return redirect(url_for('login', next=request.url))

    app.logger.warning('Agent: %s',request.headers.get('User-Agent'))
    app.logger.warning('Host: %s',request.headers.get('Host'))
    app.logger.warning('Auth: %s',request.headers.get('Authorization'))
    proc = subprocess.Popen(["uptime"], stdout=subprocess.PIPE)
    (out, err) = proc.communicate()
    #print "program output:", out
    option = ''
    if request.method == 'POST':
      option = request.form.get('options', 'empty')
      #option = request.form['options']
      #print "option:", option
      if option == 'on':
  	#app.logger.debug('A value for debugging')
  	#app.logger.warning('A warning occurred (%d apples)', 42)
  	#app.logger.error('An error occurred')
  	app.logger.warning('Server was turned on')
        GPIO.output("P8_11", GPIO.LOW)
    	time.sleep(3)
        GPIO.output("P8_11", GPIO.HIGH)
  	app.logger.warning('Server was turned on (end)')
  	msg = 'Server turned on.'
      elif option == 'off':
  	app.logger.warning('Server was turned off')
        GPIO.output("P8_11", GPIO.LOW)
  	time.sleep(6)
        GPIO.output("P8_11", GPIO.HIGH)
  	app.logger.warning('Server was turned off (end)')
  	msg = 'Server turned off.'
      elif option == 'reset':
  	app.logger.warning('Server was reset')
        GPIO.output("P8_12", GPIO.LOW)
  	time.sleep(2)
        GPIO.output("P8_12", GPIO.HIGH)
  	app.logger.warning('Server was reset (end)')
  	msg = 'Server reset.'
      elif option == 'on2':
  	#app.logger.debug('A value for debugging')
  	#app.logger.warning('A warning occurred (%d apples)', 42)
  	#app.logger.error('An error occurred')
  	app.logger.warning('NAS was turned on')
        GPIO.output("P8_14", GPIO.LOW)
    	time.sleep(3)
        GPIO.output("P8_14", GPIO.HIGH)
  	app.logger.warning('NAS was turned on (end)')
  	msg = 'NAS turned on.'
      elif option == 'off2':
  	app.logger.warning('NAS was turned off')
        GPIO.output("P8_14", GPIO.LOW)
  	time.sleep(6)
        GPIO.output("P8_14", GPIO.HIGH)
  	app.logger.warning('NAS was turned off (end)')
  	msg = 'NAS turned off.'
      elif option == 'reset2':
  	app.logger.warning('Server was reset')
        GPIO.output("P8_13", GPIO.LOW)
  	time.sleep(2)
        GPIO.output("P8_13", GPIO.HIGH)
  	app.logger.warning('NAS was reset (end)')
  	msg = 'NAS reset.'
      elif option == 'on3':
  	app.logger.warning('TimeLight was turned on')
        GPIO.output("P9_21", GPIO.LOW)
  	app.logger.warning('TimeLight was turned on (end)')
  	msg = 'TimeLight turned on.'
      elif option == 'off3':
  	app.logger.warning('TimeLight was turned off')
        GPIO.output("P9_21", GPIO.HIGH)
  	app.logger.warning('TimeLight was turned off (end)')
  	msg = 'TimeLight turned off.'
      else:
        msg = 'Pick one.'
  	app.logger.warning('No option picked')
    template_data = {
        'title' : option,
        'msg'   : msg,
        'out'   : out,
    }
    return render_template('secret_page.html', **template_data)

@app.after_request
def apply_caching(response):
    response.headers["Server"] = "Waiter"
    return response

if __name__ == "__main__":
    app.run('0.0.0.0', debug=True, port=12345)
File: secret_page.html
<!DOCTYPE html>
   <head>
    <title>{{ title }}</title>
    <meta name="viewport" content="width=device-width, initial-scale=1.0">
    <link rel="stylesheet" type="text/css"
      href="{{url_for('static',filename='bootstrap.css')}}">
    <link rel="stylesheet" type= "text/css"
      href="{{url_for('static',filename='bootstrap-theme.css')}}">
    <script>
   function clickAndDisable(link) {
     // disable subsequent clicks
     link.onclick = function(event) {
        event.preventDefault();
        document.getElementById("sub").className = "btn btn-default disabled";
     }
   }
    </script>
    </head>
    <body>
      <div class="container">
       <div class="col-lg-1 col-centered">
          <br><p class="row"> {{ out }} </p>
         <form name="boot" class="form-check" action="" method="post" onsubmit="">
           <p>
             <div class="form-check">
               <label class="form-check-label">
                 <input class="form-check-input" type="radio" name="options" id="on" value="on">
                 S-On
               </label>
             </div>
             <div class="form-check">
               <label class="form-check-label">
                <input class="form-check-input" type="radio" name="options" id="off" value="off">
                 S-Off
               </label>
             </div>
             <div class="form-check">
               <label class="form-check-label">
                <input class="form-check-input" type="radio" name="options" id="reset" value="reset">
                 S-Reset
               </label>
             </div>
             <div class="form-check">
               <label class="form-check-label">
                 <input class="form-check-input" type="radio" name="options" id="on2" value="on2">
                 N-On
               </label>
             </div>
             <div class="form-check">
               <label class="form-check-label">
                <input class="form-check-input" type="radio" name="options" id="off2" value="off2">
                 N-Off
               </label>
             </div>
             <div class="form-check">
               <label class="form-check-label">
                <input class="form-check-input" type="radio" name="options" id="reset2" value="reset2">
                 N-Reset
               </label>
             </div>
             <div class="form-check">
               <label class="form-check-label">
                 <input class="form-check-input" type="radio" name="options" id="on3" value="on3">
                 L-On
               </label>
             </div>
             <div class="form-check">
               <label class="form-check-label">
                <input class="form-check-input" type="radio" name="options" id="off3" value="off3">
                 L-Off
               </label>
             </div>
           </p>
           <p> <input type=submit value=Submit id="sub"
                  onclick="clickAndDisable(this);"
                  class="btn btn-default">
           </p>
         </form>
           {{ msg }}
       </div>
      </div>
    </body>
</html>
File: login.html
<!DOCTYPE html>
  <head>
    <title>login page</title>
    <meta name="viewport" content="width=device-width, initial-scale=1.0">
    <link rel="stylesheet" type="text/css"
      href="{{url_for('static',filename='bootstrap.css')}}">
    <link rel="stylesheet" type= "text/css"
      href="{{url_for('static',filename='bootstrap-theme.css')}}">
  </head>
  <body>
    <div class="container">
     <div class="col-lg-1 col-centered">
      <h1>Please login</h1>
      <br>
      <form action="" method="post">
       <div class="form-group row">
        <input type="text" placeholder="Username" name="username" value="{{
          request.form.username }}">
       </div>
       <div class="form-group row">
         <input type="password" placeholder="Password" name="password" value="{{
          request.form.password }}">
       </div>
       <div class="form-group row">
        <input class="btn btn-default" type="submit" value="Login">
       </div>
      </form>
      {% if error %}
        <p class="error"><strong>Error:</strong> {{ error }}
      {% endif %}
     </div>
    </div>
  </body>
</html>
File: main.html
<!DOCTYPE html>
   <head>
    <title>{{ title }}</title>
    </head>
    <body>
	  <h1>
			<a href="/on" id="on" class="large_button">ON</a>
	  </h1>
	  <h1>
			<a href="/off" id="off" class="large_button">OFF</a>
	  </h1>
    </body>
</html>
Put the bootstrap css package in directory ./static.
Reference: https://getbootstrap.com/
Reference
@book{9781119533160,
   Author = {Derek Molloy},
   Title = {Exploring BeagleBone: Tools and Techniques for Building with Embedded Linux},
   Publisher = {Wiley},
   Edition = {Second},
   Year = {2019},
   ISBN = {9781119533160},
   URL = {http://www.exploringbeaglebone.com/}
}
Code for book: https://github.com/derekmolloy/exploringBB
Continue
Now that you have experimented with BeagleBone SBC, next our travels take us far away to Media Land. The sights and sounds of Video and Audio controlled and maintained by your computer.
Proceed in the order presented, some things are depending on prior setups.
Book Last Updated: 29-March-2024
Electronics on a BeagleBone - Linux in the House - https://linux-in-the-house.org
